Sony ericsson devices
xperia x10
(turn the phone on while holding the back button)
xperia x10 mini
(Press BACK button few times right after white SE
logo appears.)
xperia x10 mini pro
(boot up phone.as soon as display is on press the back key many time till you enter recovery)
xperia x8
(Turn phone on, while holding power button and pressing back button many times)
xperia arc
( reboot
your device and press the Volume Down key
when the Sony Ericsson logo appears when the
notification LED turns blue.)
xperia arc s
(power plus vol down)
xperia play
(Turn device off. When off, press the power button,
and start tapping the back button untill device boots
into recovery)
xperia neo v
(Volume Up and Volume Down keys and then
pressing the Power Key until u boot to recovery)
sony tablet s
(Hold down power and volume up button..when SONY logo appears, release power button
but keep pressing volume up button until it loads into recovery)
xperia mini
(Now start the phone. When you see the free xperia
logo, keep pressing volume down until recovery
menu appears. )
xperia mini pro
(Press the Power button and while the device is rebooted, press the Volume
Rockers a few times to boot into the
Recovery. )
xperia active
(currently unavailable,flash rom thru fastboot)
xperia ray
(press the volume down key a few times when your
phone boots up. The sony logo brightens at one
point, press during that time)
xperia s
(Power off the phone. Power it back
on. When you see the splash screen
and the LED light turns blue, press
the Volume Up button. This allows
you to enter Recovery Mode.)
xperia p
(at boot up keep
pressing the vol up button when you
see blue led and feel small vibration from the
device)
xperia u
(currently unavailable,flash rom thru fastboot)
xperia solar
(currently unavailable,flash rom thru fastboot)
Friday, July 22, 2016
Saturday, June 11, 2016
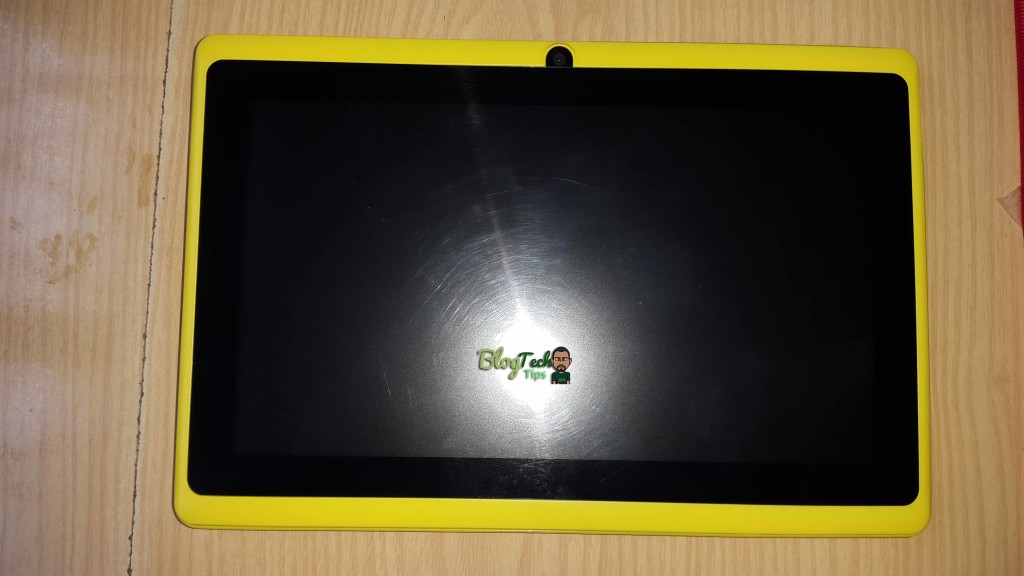
How to identify your Tablets Processor and Board ID
How to identify your Tablets Processor and Board ID?
The process of identifying your tablets firmware begins with knowing your Tablets Processor and board ID, believe it or not most of these entry-level Chinese tablets are usually sporting similar boards and processors for the most part, the names of the devices might change e.g. Alldaymall, Irulu, GPad or so on but beneath they are sporting similar hardware and all you have to do is find a firmware that matches the board ID and the processor or ones thats close and you can flash your tablet and have it functioning as new. The two main type of processors that you will find on your tablet are usually the A13 and A10 processors respectively.
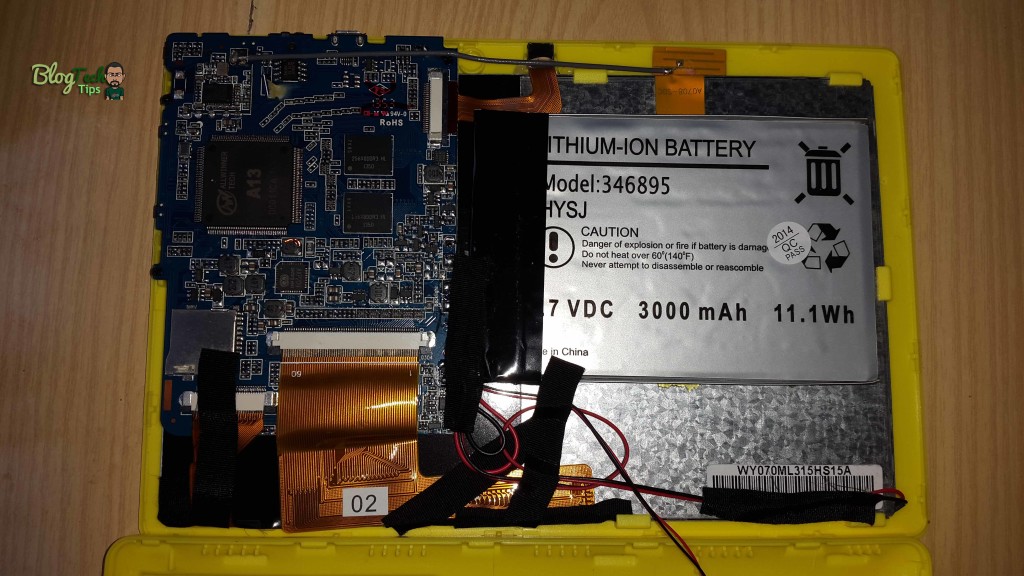
To find out both you will need to open your Tablet, do not panic it’s not as bad as it sounds trust me, here are the steps:
1. Tablets do not have screws that seal them in most cases so you will have to find the seems that hold both halves together.
2. Once you have found the seems, use a tool set such as the ones used in opening phones or a blunt object and force it into the seems,its best to start around the charge port in most cases, the parts will separate with little trouble as long as you are firm-do not break the clips that hold both halves together but separate the halves until the entire thing comes apart.You can refer to the video for details instructions.

3. Once both halves separate, carefully move them apart and watch out for wires such as the one that runs from the speakers.
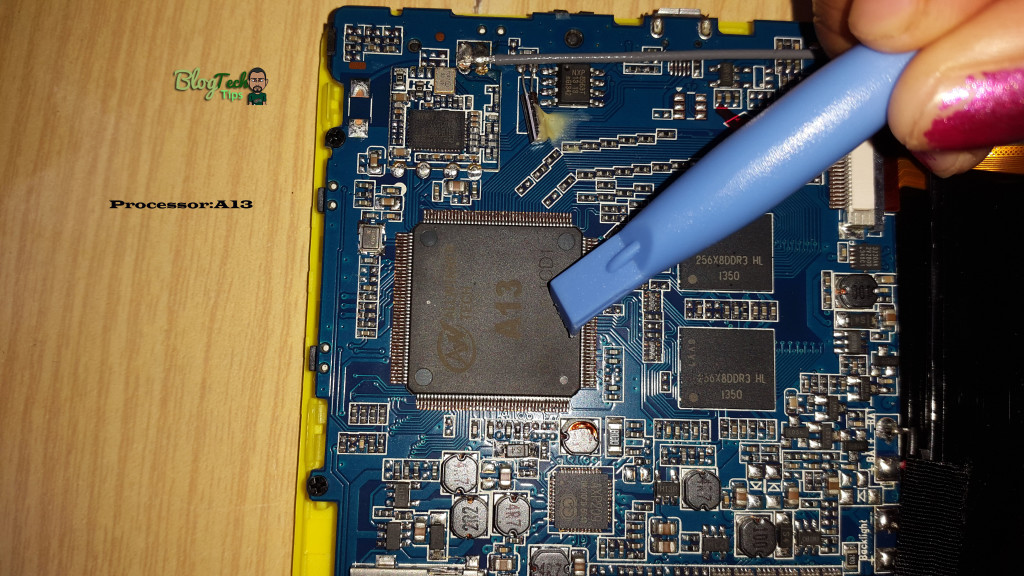
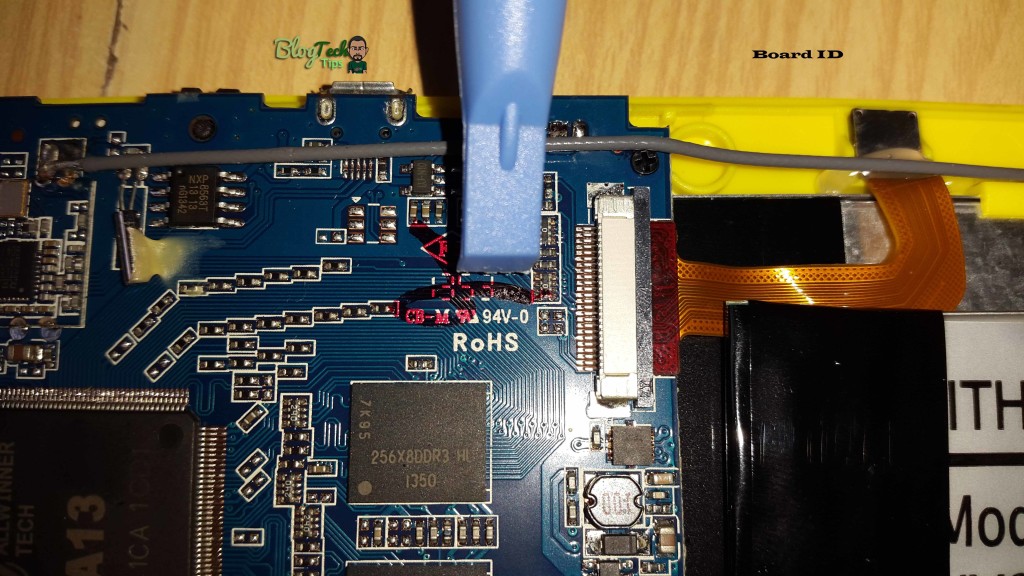
4. Look on the main part of the board and you should see a processor look out for A13 or A10 marked on them clearly:

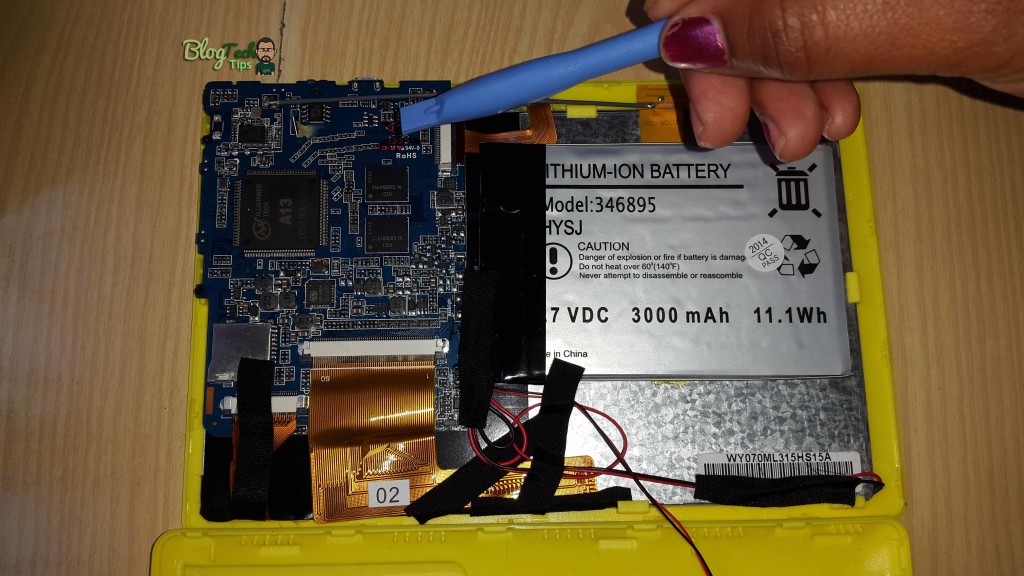
5. Last look on the board for a number its usually at the top section and it’s clearly written, this will be your Board ID, record it:

That’s it you have just found your Motherboard ID and Processor, in this case the board in the tablets ID was: CB-M RU 94V-0
The processor was: A13
So now I need to search in Google for “A13 CB-M RU 94V-0 Firmware”
Friday, June 3, 2016
BIOS Password
Laptops in general have much better hardware security than PCs. Some of them even come with fingerprint reader build in.
Most laptops come with a very strong BIOS password capability that locks up the hardware and makes the laptop completely unusable. This is the password that has to be entered before the operating system loads, usually on a black screen a few seconds after the laptop is started.
Of course BIOS password can be set on a PC too, but there it is stored together with the other BIOS settings – date, time, hard disk size, etc. It is very easy to reset the BIOS settings (and the password) on a PC – usually there is a jumper near the BIOS battery on the motherboard that needs to be moved from connecting pins 1+2 to pins 2+3 for a few seconds and than moved back to pins 1+2. Next time the PC is started it will alert you “… BIOS settings invalid… Defaults loaded… Press F1 to continue…” or something similar, and…. the password is gone!
However most laptops store the BIOS password in a special chip, sometimes even hidden under the CPU, that is not affected when the rest of the BIOS settings are reset. This makes the removal of a BIOS password on a laptop almost impossible. The only option in most cases is to replace the chip which is quite expensive and risky procedure and, of course, not supported by the manufacturers.
Some manufacturers (like Dell) can generate a “master password” for a particular laptop (from their service tag) if sufficient proof of ownership is provided. Others (like IBM) would advise replacing the laptop’s motherboard (very expensive). On some old laptops (4 – 5 years or older) the BIOS password can still be reset relatively easy, usually by shorting two solder points on the motherboard or by plugging a special plug in the printer port, etc.
In almost all cases on newer laptops it is either a big hassle, expensive or even impossible to reset the BIOS password, making it a very good way of protecting your laptop from unauthorized use.
However what makes your computer exactly yours are your own files, documents, emails, pictures, etc. They are all stored on the hard drive. So, even if your laptop has a BIOS password that locks it up and makes it completely unusable to anyone that doesn’t know it, your hard drive can still be removed from the laptop and connected to another computer, and your files retrieved quite easily.
How do I clear a laptop BIOS or CMOS password?
A laptop BIOS password is more secure than a traditional desktop to help protect the data if it was stolen. If you are the original owner of the laptop, we highly recommend contacting the manufacturer of the laptop. Companies such as Dell, Lenovo, and Toshiba can reset the password if you are the original owner using the Service Tag, disk, or give you exact steps for your laptop.
If you are not the original owner of the laptop, there are some ways to bypass the password depending on the manufacture and model of the laptop.
5 to 8 character code on System Disabled screen
In the CMOS setup, when prompted for a password, guess three times until you're giving the code. If, after entering the wrong password three times, the computer is displaying a 5 to 8 code, as shown in the picture, continue to the next step.
Write down the code and visit Dogbert's BIOS Password Backdoors scripts page to download Python and the free Python scripts to clear many of these types of passwords.
As the computer is booting, press F1, F2, or Del to enter CMOS setup.
Clear by dip switches, jumpers, jumping BIOS, or replacing BIOS
If the above suggestions do not apply to your laptop, you need to open the laptop and clear the password using dip switches or jumpers. You may also be able to jump the BIOS using a paperclip, by soldering a wire to pins on the BIOS, or replacing the BIOS chip.
The location of dip switches or jumpers on the motherboard depends on the brand and model of your laptop. Check the technical documentation for your laptop and contact the manufacturer to determine which motherboard is in your laptop. Search the Internet for that motherboard model for a technical diagram of where components are located, including the dip switches or jumpers for resetting the BIOS.
Which step you take depends on the manufacturer and model of your laptop computer. For most end users we highly recommend having the laptop serviced by a qualified technician who can properly disassemble a laptop.
Contact laptop manufacturer
If the above steps do not help remove the CMOS password for your laptop, we suggest contacting the laptop manufacturer for steps on how to clear the password. Many manufacturers have strict policies in place to help protect their customers' laptops and only they have the information on how to clear CMOS passwords.
To try unlock code with
https://bios-pw.org/
links: http://www.computerhope.com/issues/ch001302.htm
http://www.laptoptips.ca/security/bios-password/
Monday, June 1, 2015
Fix windows Service error : ex- Printer spooler Stopping
Fix windows Service error
Previous Windows Operating Systems will return following error message “The print spooler service is not running” when you try to print or open printer properties, which means something wrong with the print spooler service on the computer.

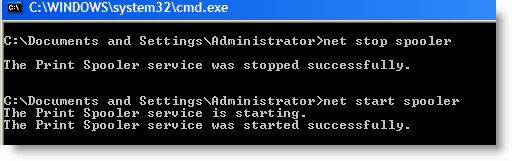
Simple step you can do straightaway is, starting the print spooler service from Services ( or in command prompt as on step 2) manually.Steps to Fix Print Spooler Keeps Stopping Automatically Issue on Windows 7, Windows 8 and 8.1
1) ‘Services’ can be found under Computer Management, but to access it easily on Windows 8 or 8.1, type ‘Services.msc’ on search.
2) If you like commands, then use this method to start/stop print spooler in command prompt. Make sure to open command prompt with administrator privilege ( Run as Administrator).
To start print spooler, type;
Net start spooler
To stop print spooler, type;
Net stop spooler
If print spooler keeps stopping in Windows 8,8.1 or 7 even after starting the print spooler as mentioned earlier, then follow below steps.
3) You can try below steps if you think print spooler is not responding to your print commands and print is not happening when printer is fine physically (No paper jam or any error indications on printer hardware). These methods will help to clear the pending print jobs (print queue) and hanging spooler service.
Clear the print spooler files where the Operating Systems store printing jobs temporarily, deleting these file will allow the print spooler to start freshly and run smoothly next time.
Go to C -> Windows -> System32 -> Spool -> Printers and delete all files inside this folder. This is the location OS keeps the printing jobs before sending to printers. Once you delete these files, print queue will be cleared. The same location is applicable for latest Windows 8 and 8.1 too.

Most of the times these steps will solve the print spooler keeps stopping automatically issue.
If the problem still exist even after trying earlier steps (if the physical printer connectivity is fine and physically there are no issues on the printer, cartridges and out of papers) on your Windows 8, 8.1 or Windows 7 computers, try these additional steps.Additional Steps to Fix
1) Make sure you have already done mentioned earlier methods..
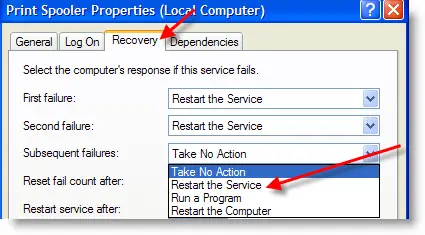
2) Go to services ( as on step 1) under Computer Management, Double click Print Spooler service and go to Recovery tab. Here we can set what that service should do when it fails.
Select ‘Restart the Service’ in Subsequent Failures field. So, it will try restarting print spooler service whenever it fails.

This will not be the permanent solution if the spooler service keeps stopping and automatically restarting again and again. Better find out the real problem and fix it.
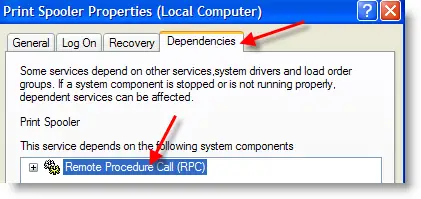
3) Go to ‘Dependencies’ tab and make sure all depending services are started. Luckily, only one dependency service for print spooler service which is Remote Procedure Call (RPC) service.
So, check the RPC service in services and make sure it’s already started, these methods are applicable for Windows 8,8.1 and 7 too.

4) Last step which worked for me recently, wrong printer driver installation. Yes, if you installed completely unrelated wrong driver to any of the network or local printer, you may face this print spooler stopping frequently problem. By default Windows OS tries to communicate with all printers very often even if you don’t print on theme. When printer and OS talk wrongly because of wrong driver installation, Windows stops the print spooler service automatically.
Try these two methods,
a) Delete all unwanted printers from your computer.
b) Make sure all printers are installed with proper drivers ( or at least with similar model)
Once I changed to correct print driver, it solve my problem very easily.
Try the above methods, I’m sure one of them will solve print spooler stopping automatically problem.
Tuesday, May 5, 2015
SIM card Cords Mobitel Aialog Airtel in Sri Lanka
Dialog
* සිම් එක කාගෙද - #132#
* තමන්ගෙ නමට තියන වෙනත් සිම් - #132#1#1#
*ගිණුමේ ශේෂය ඉහල දැමීමට - *123*පින් අංකය#
*ගිණුමේ ශේෂය - *#456#
*අමතර අවශ්යතා - #107#
*සම්බන්දතාවය ගැන විස්තර #678#
*ණයක් ගන්න - #356#
*කරදරකාර එස් එම් එස් බ්ලොක් කරන්න - BLOCK<space>Block කරන්න ඕනි අංකය තමාගෙම අංකෙට මැසේජ් එක යවන්න
*එස් එම් එස් ඩයිවරට් කරන්න - DVI<space>Divert කරන්න කරන්න ඕනි අංකය තමාගෙම අංකෙට මැසේජ් කරන්න
*Star Points බලාගන්න - #141#
*Call Waiting Activate කරන්න - *#43#
*Missed call Alert Active කරගන්න - **62*0777012012#
*Dialog Mobile BROADBAND ( එස් එම් එස් වලින ඇක්ටිව් කරගන්න )
KBB<SPACE>පැකේජය (20,50,100,200,400) තොරා 678 ට සෙන්ඩ් කරන්න
පෙරගෙවුම් වයිෆයි
පැය 2 - WIFI<space>50
පැය 4 -WIFI<space>100
පැය 12 - WIFI<space>200
පැය 20 WIFI<space>400
පැය 50 - WIFI<space>1000 ලෙස ටයිප් කර 678 ට සෙන්ඩ් කරන්න
ඩයලොග් භාවිතාකල දත්ත ප්රමාණය දැනගැනීමට MBB ලෙස ටයිප් කර 678 ට සෙන්ඩ් කරන්න
Mobitel
* සිම් එක ගැන විස්තර - #132#
* ශේෂය ඉහල දැමීමට - *102*පින නම්බරය#
* ගිණුමේ ශේෂය බලාගැනීමට - *100#
* ණයක් ගැනීමට - #247#
* ණයක් දෙන්න - *448*අවශ්ය අංකය*ණයමුදල#
* GPRS / MMS සෙටින් ලබාගැනීමට -#222#
* M tune ඉවත් කරගැනීමට Unsub ලෙස 777ට එවන්න
* Mobitel Mobile Broadband SMS මගින් ඇක්ටිව් කරගන්න.
දිනක 100 Internet පහසුකම ලබාගැනීමට නම් D25 ලෙස 7678ට SMS කරන්න.( D25, D75, D299 ලෙස යැවීමෙන් 200MB හා 1GB ලෙස ඇක්ටිව් කරගත හැක )
Hutch
* සිම් එක ගැන විස්තර #132#
* ගිණුමේ ශේෂය *344#
* Missed Call Alert ඇක්ටිව් කරගන්න - *62*1000#
* Credit නැතිවෙලාවට කොල් එකක් ගන්න කියන්න - යාලුවගෙ අංකය ටයිප් කර 456ට යවන්න
* Sms Free Hutch to Hutch පැකේජය *222#
Etisalat
* සිම් එකේ විස්තර දැනගැනීමට #132#
*ගිණුමේ ශේෂය ඉහල දැමීමට *336*පින් නම්බර් ඩයල් කරන්න නැතහොත් #133*pin no# අමතන්න
*ගිණුමේ ශේෂය දැන ගැනීමට #134#
*Missed Call Alert Active කර ගැනීමට *346 Dial කරන්න
*Call A tune සදහා *359 අමතන්න
*සම්බන්දතාවය ගැන දැන ගැනීමට *262 Dial කරන්න
*mobile broadband
දිනක 50Mb ක අන්තර්ජාල පහසුකම සදහා D29
දින 7 ක 150Mb ක අන්තර්ජාල පහසුකම සදහා W49
මාසෙක 1GB ක අන්තර්ජාල පහසුකම සදහා M299 ලෙස ටයිප් කර 2211ට Sms කරන්න
* Etisalat Service - #111#
Air Tel
* සිම් එක ගැන විස්තර දැනගැනීමට #132# හො *140*6570#
* ගිණුමේ ශේෂය දැන ගැනීමට *555#
* ගිණුමේ ශේෂය ඉහල දැමීමට *567#පින් නම්බර්#
* GPRS/MMS settings ලබා ගැනීමට ALL ලෙස ටයිප් කර 2222ය සෙන්ඩ් කරන්න
පසුගෙවුම් සබදතා සදහා
* Outstanding balance - *555*1#
* Unbilled balance - *555*2#
* Bill Summery - *555*3#
* Payment Status - *555*4#
Wednesday, April 29, 2015
elecom htu332 gbk write protect error Solved
elecom htu332gbk 32GB Flash Drive write protect error Solved
Use these Simple Methods
http://www.makeuseof.com/tag/how-to-fix-write-protection-errors-on-a-usb-stick/
If not Solved Pls download Restore-v3.13.0.0.exe
I Use this tools to Restore
elecom htu332gbk 32GB
Phison PS2251-02
| Toshiba | 983AA892 | 13FE | 5100 | Phison | 32 |
Download
http://anton34rus.spaces.ru/files/?r=main/view&Li=5&Lii=49713319&Link_id=1551637&Lt=6&Read=52489173&Sn=26&from=shared_zone&link_id=1551637&sid=3918809442722391
-
Run Exe
select drive to Format
Select Restore Button
After Finish Repluf usb and copy any File
Before format backup all files to Hard drive
Tuesday, February 10, 2015
All Wintouch Firmwares
All wintouch Frimeware
http://forum.gsmhosting.com/vbb/f606/firmware-collection-all-wintouch-firmwares-flasher-tools-download-here-1652650/
if you need firm ware for win touch models and soft winer A106 (is matched with q91)
Subscribe to:
Posts (Atom)