Sonic Micro system is your technological supporter. We are selling Tablets, Laptops ,and pcs also parts and accessories. Our Website: https://sites.google.com/site/sonicpcsale Email:sonicpcmat@yahoo.com Sonicpcmatara@sltnet.lk Phone: 0094722814306
Thursday, December 19, 2013
Friday, December 13, 2013
Samsung Galaxy S4 vs Apple iPhone 5
Samsung Galaxy S4

 Also known as
Samsung Galaxy S IV,
Samsung I9500,
Samsung I9505,
Samsung SPH-L720,
Samsung Galaxy S 4,
Samsung SGH-I337,
Samsung SCH-I545,
Samsung SGH-M919,
Samsung
SCH-R970,
Samsung Galaxy S4 LTE-A
Also known as
Samsung Galaxy S IV,
Samsung I9500,
Samsung I9505,
Samsung SPH-L720,
Samsung Galaxy S 4,
Samsung SGH-I337,
Samsung SCH-I545,
Samsung SGH-M919,
Samsung
SCH-R970,
Samsung Galaxy S4 LTE-A
Apple iPhone 5

| Design | |||
|---|---|---|---|
Device type | Smart phone | Smart phone | |
| OS | Android (4.3, 4.2.2) | iOS (7.x, 6.1, 6) | |
| Dimensions | 5.38 x 2.75 x 0.31 inches (136.6 x 69.8 x 7.9 mm) | 4.87 x 2.31 x 0.30 inches (123.8 x 58.6 x 7.6 mm) | |
| Weight | 4.59 oz (130 g) the average is 4.6 oz (132 g) | 3.95 oz (112 g) the average is 4.6 oz (132 g) | |
| Body material | Polycarbonate | Aluminium |
| Display | |||
|---|---|---|---|
| Physical size | 5.0 inches | 4.0 inches | |
| Resolution | 1080 x 1920 pixels | 640 x 1136 pixels | |
Pixel density
| 441 ppi | 326 ppi | |
Technology
| Super AMOLED | IPS LCD | |
| Colors | 16 777 216 | 16 777 216 | |
| Touchscreen | Multi-touch | Multi-touch | |
| Features | Light sensor, Proximity sensor, Scratch-resistant glass | Light sensor, Proximity sensor, Oleophobic coating |
| Camera | |||
|---|---|---|---|
| Camera | 13 megapixels | 8 megapixels | |
| Flash | LED | LED | |
| Aperture size | F2.2 | F2.4 | |
| Camera sensor size | 1/3.06" | 1/3.2" | |
| Features | Back-illuminated sensor (BSI), CMOS image sensor, Auto focus, Touch to focus, Digital image stabilization, Face detection, Smile detection, Exposure compensation, White balance presets, Digital zoom, Geo tagging, High Dynamic Range mode (HDR), Panorama, Scenes, Effects, Self-timer, Voice activation | Back-illuminated sensor (BSI), Auto focus, Touch to focus, Digital image stabilization, Face detection, Geo tagging, High Dynamic Range mode (HDR), Panorama | |
| Camcorder | 1920x1080 (1080p HD) (30 fps) | 1920x1080 (1080p HD) (30 fps) | |
| Features | Digital image stabilization | Digital image stabilization, Video calling | |
| Front-facing camera | 2 megapixels | 1.2 megapixels |
| Hardware | |||
|---|---|---|---|
System chip
| Qualcomm Snapdragon 600 APQ8064T | Apple A6 | |
Processor
| Quad core, 1900 MHz, Krait 300 | Dual core, 1300 MHz, Apple Swift | |
| Graphics processor | Adreno 320 | PowerVR SGX543MP3 | |
System memory
| 2048 MB RAM | 1016 MB RAM | |
| Built-in storage | 16 GB | 16 GB | |
| Maximum User Storage | 9 GB | ||
| Storage expansion | microSD, microSDHC, microSDXC up to 64 GB |
| Battery | |||
|---|---|---|---|
| Stand-by time | 9.4 days (225 hours) the average is 20 days (485 h) | ||
| Talk time (3G) | 17.00 hours the average is 12 h (700 min) | 8.00 hours the average is 12 h (700 min) | |
| Stand-by time (3G) | 15.4 days (370 hours) the average is 19 days (454 h) | ||
| Stand-by time (4G) | 13.3 days (320 hours) the average is 17 days (419 h) | ||
| Capacity | 2600 mAh | 1440 mAh | |
| Not user replaceable | Yes | ||
| Wireless charging | Optional |
| Multimedia | |||
|---|---|---|---|
| Music player | |||
| Filter by | Album, Artist, Playlists | Album, Artist, Genre, Playlists | |
| Features | Album art cover, Background playback | Album art cover, Background playback | |
| Speakers | Earpiece, Loudspeaker | Earpiece, Loudspeaker | |
| YouTube player | Yes | Yes |
| Internet browsing | |||
|---|---|---|---|
| Built-in online services support | YouTube (upload), Picasa/Google+ | YouTube (upload) |
| Technology | |||
|---|---|---|---|
CDMA
| 800, 1700/2100, 1900 MHz | ||
| GSM | 850, 900, 1800, 1900 MHz | 850, 900, 1800, 1900 MHz | |
| UMTS | 850, 900, 1900, 2100 MHz | 850, 900, 1900, 2100 MHz | |
| FDD LTE | 800 (band 18), 850 (band 5), 900 (band 8), 1800 (band 3), 2100 (band 1), 2600 (band 7) MHz | 700 (band 13), 850 (band 5), 1800 (band 3), 1900 (band 2), 2100 (band 1) MHz | |
| Data | LTE Cat3 Downlink 100 Mbit/s, LTE Cat3/4 Uplink 50 Mbit/s, HSDPA+ (4G) 42.2 Mbit/s, HSUPA 5.76 Mbit/s, UMTS, EDGE, GPRS | LTE Cat3 Downlink 100 Mbit/s, HSDPA+ (4G) 42.2 Mbit/s, UMTS, EDGE, GPRS, EV-DO Rev.A, EV-DO Rev.B | |
| Micro SIM | Yes | ||
| nano-SIM | Yes | ||
Positioning
| GPS, A-GPS, Glonass | A-GPS, Glonass, Cell ID, Wi-Fi positioning | |
| Navigation | Yes | Turn-by-turn navigation |
| Connectivity | |||
|---|---|---|---|
| Bluetooth | 4.0 | 4.0 | |
| Wi-Fi | 802.11 a, b, g, n, n 5GHz, ac | 802.11 a, b, g, n, n 5GHz | |
| Mobile hotspot | Yes | Yes | |
| USB | USB 2.0 | Yes | |
| Connector | microUSB | Proprietary | |
| Features | Mass storage device, USB Host, USB charging | USB charging | |
| HDMI | via microUSB | ||
| Other | NFC, DLNA, MHL, Tethering, Computer sync, OTA sync, Infrared | TV-Out, Tethering, Computer sync, OTA sync |
| Other features | |||
|---|---|---|---|
| Notifications | Service lights, Haptic feedback, Music ringtones (MP3), Polyphonic ringtones, Vibration, Flight mode, Silent mode, Speakerphone | Music ringtones (MP3), Polyphonic ringtones, Vibration, Flight mode, Silent mode, Speakerphone | |
| Additional microphone/s | for Noise cancellation, Video recording | ||
| Sensors | Accelerometer, Gyroscope, Compass, Thermometer, Gesture, Humidity, Barometer | Accelerometer, Gyroscope, Compass | |
| Hearing aid compatibility | M4, T4 | ||
| Other | Voice dialing, Voice commands, Voice recording | Voice dialing, Voice commands, Voice recording |
| Artical by: http://www.phonearena.com/phones/compare/Samsung-Galaxy-S4,Apple-iPhone-5/phones/7597,7378 |
IS YOUR MOBILE PHONE ORIGINAL ??? CHECK IT NOW
There is an easy way to check the originality of your mobile phone.
Type *#06# and press Dial button [the green one]
_________________________________
After doing this, you will see a 15 digit IMEI code, like 154796009526653.
Then you have to check only the seventh and eighth digit of the 15 digit IMEI code. Only by checking the 7th and 8th digit you can verify whether your mobile phone is original or not ?
Very easy. Right ?
__________________________________
___________________________________
This will help you to pick the good one. Try it. But, remember, these tips may not work with the Sony Erickson Mobile Phone.
Artical by:http://mallock.blogspot.com/2007/10/is-your-mobile-phone-original-check-it.html
Tablet vs Phablet

Phablet is a new termed coined in the market, a nick-name given to a smartphone which looks like a tablet pc or vice-versa. The so called phablets primarily( if not only) differentiate themselves from its technological younger and elder brothers in terms of screen size they carry. So far we have seen phablets with the screen size 5-7 inch only and presumably it’s going to be a standard size range. The rationale behind release of anything like this is the desire for a smartphone phone with a bigger screen, yet handy so as to carry around hassle-free.
But still phablets pose not much threat to the Tablet PCs yet. Tablets have their own matchless stature, when it comes to utility. In various corporate structures, educational institutions and professions ( like doctors, architects) where they require books and presentations up and ready all the time; tablets still make to the most favorite resource.
Find some of our observations which differentiates the Phablets from the Tablets, so far:
| Features | Phablet | Tablet |
| Size | 5-7 inch | 7 i-11 inch |
| Optimized for | mobile web and multimedia | mobile web, multimedia, software, reading ebooks |
| Stylus | Yes | No |
| USB | micro USB | USB 2.0 |
| Weight | Upto 200 gms | Upto 750 gms |
| HDMI | No | Yes |
| Battery | Upto 3100 mAh | upto 42 watt |
| Customer base | People looking for phones with bigger screen size. | People who see Tablets as a replacement to laptops. |
| Popular branded models | Samsung Galaxy Note, Samsung Grand, Dell Streak | Ipad 2, Samsung Galaxy Tab, Micromax Funbook |
Artical by: http://mytabletguru.com/tablet-pc-vs-phablet/
How to Identify A Fake Samsung Galaxy Phone
How to Identify A Fake Samsung Galaxy Phone
Samsung smartphones are selling like hot cakes all over the world despite of what ever hardware they contain. Samsung are making lots of smartphones for all and each categories in short period of time that helped to make a internet quote "Another Day, Another Galaxy". While the consumers grabbing their Galaxy phones, Some local phone manufacturers take this opportunity to their advantage. There are number of Replicas to some iconic devices made by Samsung, which makes people confused which one is the original and which one is the fake or the clone.
Now This post is for all who want to know what are the differences between an original one and a replica, What are the advantages and flops of Buying a replica and ways to spot a replica. Here in Sri Lanka the latest Galaxy S4 clones are going for a price tag of Rs.25,000 which means around 190$-200$. So i mostly talking about the Galaxy S4 replicas which make sense, why all people wanna buy it. As the 2013 H1 flagship Galaxy S4 turned out to be a beast among the high end smartphones. All dreamed to have a one in their pockets including me. So if you are a Sri Lankan, better read this post i have written in Sinhala in my other blog. Korean Version vs Original Version (For Sri Lankans)
Difference Between a Clone and an Original Device
There are noticeable differences we can find under Hardware, Software and physical view. Lets see what are the physical differences we can spot.

What you see here is a low grade S4 clone. most easiest clones to spot. Home button is way below the screen, top and bottom bezels are huge, Samsung logo is big, Screen is not an edge to edge one,even it's not an 5 inch and the rear side features cheap plastic cover with pattern less design. Samsung branding could covered by a sticker as it can fade away when we scratch it. even the front side Samsung branding can be removed by few scratches. Battery is surely less than 2600mAh due to smaller dimensions of the phone.

This is the real deal. The above image shows one of the best 1:1 clones in the market. Meet HDC Galaxy S4 Legend. HDC mobiles is no doubt the best clone maker of Samsung handsets. As you can see, it's identical to the original S4 from physical overview. Latest version comes with a glass layer on top of the screen,so we can't scratch the logo off. screen goes edge to edge and features a real 5" screen, home button is on the right spot and back panel have those patterns that an original S4 have. it's an advantage for S4 Legend users they can use original S4's battery and casings thanks to the copying skills of HDC. These clones have only hardware and software differences although the type of plastic used is different.
On the Hardware Side Everything is different and cheap. Most S4 clones uses Mediatek processors clocking at 1.2Ghz, even though they are quad core or dual core chips, the architecture is Cortex-A7. Actually it's not bad for day to day use. but the problem comes when playing heavy graphics games and heavy multitasking.
Storage is limited to 8GB or usually 4GB, and from that around 2GB is user accessible. RAM is 1GB in most S4 clones but pre installed edited AnTuTu app shows different values. As i mentioned before, best clones are made by the Chinese phone manufacturer HDC. if you pay a visit to their HDC Mobiles.com website you can see how the things work. The following image is taken from their site.

These are the specifications of HDC Galaxy S4 Spark, Same conditions apply for S4 Legend. The screen is actually a 5" 720p IPS pannel. But in system info, it shows 1080p. And the Super AMOLED sticker on the phone will trick you thinking it really has a AMOLED panel. Like i said storage is 4GB and system shows 16GB. Batteries are the worst case. Clones bundles with 2 batteries in most scenarios. These batteries are showing 2600mAh but they don't have the real capacity. Original factory made S4 battery weights around 70g while clone batteries just 40g.
Camera in HDC legend is a 13MP shooter but takes verry noisy images. My 3.2MP camera in Nokia 6210 takes much better images than that. (link to a Sample image from HDC Galaxy Legend 13MP camera -Click Here )
From the software side, most clones run Android 4.2.2 Jelly Bean. Take another look at the spec sheet above. Android version is 4.2.9 what does that mean? There is no 4.2.9 version in Android 4.2.X series. The device could run 4.2.2 or 4.2.1 instead. HDC made custom UI is almost identical to Samsung's TouchWiz UI. Keep in mind you don't have split screen multi-window feature in clones although they have a side app bar.
Those are the major Hardware differences in Clones. Now if you already know you have purchased a replica let's see what are the advantages and down sides. For those who got a replica by cheating sellers who sells these phones as original, i feel sorry for them.
ADVANTAGES - Relatively newer version of Android covers your needs
Play Store Access
Feeble chipset and hardware but does your daily needs
Big screen entertainment and easy to type
Hardware parts are available
Original S4 battery can be used (Only with HDC S4 Legend)
FLOPS - No information about SAR values
Number of complains of bezel cracking
No NFC, Screen Protection
Low capacity batteries
Screen get's less sensitive and often dead pixels
No Genuine Software Tweaks,camera modes and some sensors.
No warranty / hard to claim warranty
Finally let's move on to spotting a Samsung replica
Most clones comes with a genuine wooden looking Samsung package. But inside contains flip covers and sometimes two batteries and small gadgets like USB card readers. Documentation and USB cable is present in the box but i have no idea about the headset whether it's a original or fake or about it's audio quality.

These HDC phones are manufactured to work with Samsung codes like *#0*# but try to see if all things work by this LCD test code. if nothing happens for that code it's a replica.

Type some codes used in original Samsung phones
*#1234# (View SW Version PDA, CSC, MODEM)
*#0*# (General Test Mode)
*#12580369# (SW & HW Info)
*#197328640# (Service Mode)
*#0228# (ADC Reading)
*#32489# (Ciphering Info)
*#232337# (Bluetooth Address)
*#232331# (Bluetooth Test Mode)
If these codes are working, then it is an original one.
From the screen you can also identify a replica and for that you must have a knowledge about AMOLED screens. take this image for an example,

AMOLED screens have a deep vibrant colors while clones with normal TFT LCD or IPS LCD has whitish bright colors.
You can also check a Samsung phone with a micro USB Jig. One the jig is connected to your phone (Phone should be switched off before connecting the jig) it turns on and put the phone in to Download mode. if it isn't getting to download mode it's a replica

If the Baseband version is starting from "MAUI" or the Android version shows not official release,something like 4.2.9 like we saw above ,that's a replica too

And some replicas shows Android version as a latest but the build number shows what's really installed. see the image above. Android version is Android 4.2.2 but the build number is GINGERBREAD.25KJB which means it runs Android 2.3.x version.
Finally by removing the back cover you can spot a replica as shown in the image below.
Note : Most HDC clones comes under "Made in Korea By Samsung" manufacturer statement but it's Chinese for real.

FINAL WORDS : If you want to buy an Original S4 from local store make sure to check the facts you saw in the post. If you owning an replica by purpose don't keep it in your pockets (specially males) for long time since we don't know about SAR values. If you want a buy a S4 replica, buy a HDC Legend and also buy factory made Samsung battery since it's the best clone available currently in the market. These factors apply for the other Samsung phones as well. But i wanted to talk specially about Galaxy S4 as it's the device most people wanted to get in their hands.
Artical by: http://mobilizedtech.blogspot.com/2013/09/how-to-identify-fake-samsung-galaxy.html
Monday, December 2, 2013
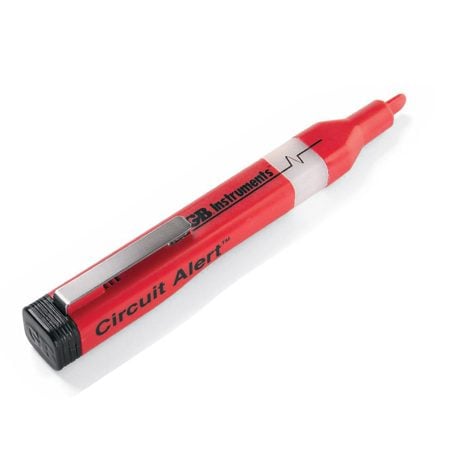
3 Usefull tools for test electric and circuits
Non-contact voltage tester: Make sure the power is off
1 of 6
Non-contact voltage tester
This is the safest tool to confirm that electrical power is off, even before you touch a wire.
The two most important safety steps to take before opening any electrical box are:
Turn off the electrical power to that outlet at the main panel.
Double-check the outlet to make sure you turned off the right circuit. A non-contact voltage tester is the best tool for this job. With this tool, you don’t even have to touch a bare wire. The tester will flash and/or chirp whenever it comes close to a hot wire. It’ll even detect voltage (a hot wire) through the wire’s plastic insulation. However, it’s not reliable when testing wires covered by metal conduit or metal sheathing.
This tester is powered by small batteries, so make sure it works before using it. Shove the tip into the slots of a receptacle that’s live, hold it near a plugged-in lamp cord or hold it against a light bulb that’s on. With most testers, you’ll see a series of flashes and hear continuous chirps that indicate voltage. Testers may flash and chirp at other times, but without the continuous pattern that indicates a hot wire.
To test whether a receptacle is hot, simply shove the tester nose into or against the plug slots (Photo 1). The hot slot is the smaller of the two. However, you never know if the receptacle was wired correctly, so it’s a good idea to test the neutral slot (the larger one) too just in case the receptacle was wired wrong. And be sure to check all the slots in the receptacle. Sometimes the lower set in a duplex receptacle will be wired separately from the top. If a wall switch controls the receptacle, make sure the switch is in the “on” position.
Then unscrew the receptacle, carefully pull it out and test all the wires again (Photo 2). At this point, you can shove the tester deeper into the box to test wires not directly connected to the receptacle. Several circuits may be present in a single box. We recommend that you turn off all circuits to a box before working on it.
To test for power at a switch, you have to remove the cover plate first. There’s usually enough space to poke the tester tip close to the screw terminals (Photo 3). If there are no live wires, unscrew the switch, pull it out and test all other wires in the box.
To test a light fixture before removing it, turn off the circuit at the main panel, turn the light switch to “on,” remove the bulb and poke the tester all the way down to the center socket button (Photo 4). If the fixture is on a three-way switch (two switches), test with one switch first in the up, then in the down position. If no voltage is present, you can safely unscrew the fixture from the electrical box, pull it out and test the other wires in the box as before.
The non-contact tester will also identify hot cables, even if they’re covered by plastic insulation
This comes in handy when you cut open a wall and find electrical cables and are unsure if they are shut off.
Circuit tester: Test for good grounding
1 of 3
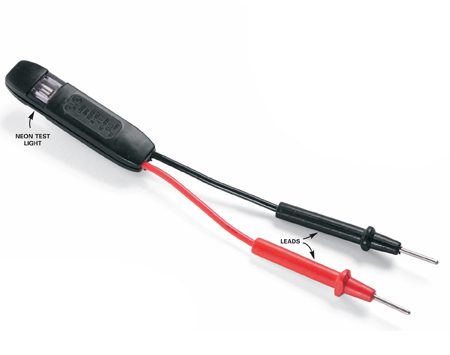
Circuit tester
The two-lead circuit tester shown here also tests for voltage. When you touch a live hot wire (black or any other color except green and white) with one lead and a neutral (white) or ground (green or bare copper) with the other, the neon test lamp should light (Photo 1). It confirms that the power is on and that you have a complete (good) circuit. If the light doesn’t come on, either the power is off or you have a bad circuit.
This tool comes in especially handy in older homes when you want to know if an equipment ground wire (green insulated or bare copper) is actually connected to ground elsewhere in the system.
You often have to check this when you replace older ungrounded switches with grounded ones as now required by the National Electrical Code. You often find an unused bare ground wire folded back into the box, and you have to test it to make sure that it’s connected to the rest of the grounding system before hooking up your new switch.
To test a ground wire, follow these five steps:
Turn the power off to the switch (confirm with the non-contact voltage tester) and uncap the neutral wires (they can remain in a bundle).
Disconnect the two switch wires and spread the bare ends so they don’t touch one another (Photo 1).
Turn the power back on and identify the hot wire with the non-contact tester.
Confirm that the circuit tester is working by carefully touching the hot wire with one lead and a neutral wire with the other. The tester will light if it’s working.
Touch the hot wire with one lead and the ground wire with the other (Photo 1). If the tester lights, the ground wire is good and you can use it.
Follow a similar procedure when working with metal boxes in which no ground wire comes into the box (Photo 2). In this case, you want to find out whether the metal box itself is grounded (through conduit or another method) and will therefore serve as the required ground.
With the wires separated and the power on, carefully touch the hot wire with one lead and the metal box with the other. If the lamp lights, you can use the metal box as a ground. If the lamp doesn’t light, in most cases the NEC requires that you upgrade the box to have some means of grounding before you install a receptacle, switch or other device. Consult a licensed electrician or your local electrical inspector for acceptable grounding methods.
Caution!
Avoid touching a live hot wire and don't let it touch anything else. Hold the tester leads by the insulated portion while making contact. And turn the circuit off again as soon as you finish the test.
Continuity tester: Identify wires and test switches
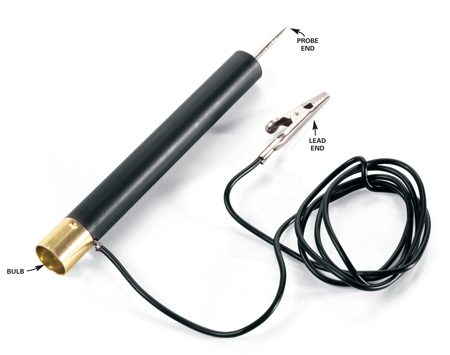
1 of 4
Continuity tester
It’s difficult and dangerous to trace the routes of various wires with circuits turned on. A continuity tester does it simply and safely with the circuits turned off. It has a probe, which contains a battery and a light bulb, and a wire lead. When you touch the ends to any continuous conductive path, usually a wire, with both the probe and the lead, a circuit will be complete and the bulb will light. In fact, to test the bulb to make sure it’s working, simply touch the lead to the probe.
Working with several boxes and can’t remember which wire goes where? With the power shut off, simply connect a test wire to a circuit wire in one box (Photo 1), clip the lead to the test wire and touch the probe to the ends of the circuit wires in the other box. The bulb will light when you find the right wire.
Another great use for the circuit tester is to determine whether a switch is working (Photo 2).
Disconnect the switch, connect one lead to one terminal and put the probe on the other while you flick the switch on and off. If the switch is good, the bulb should light up and turn off as well.
Caution!
If you have aluminum wiring, don't mess with it. Call in a licensed pro who's certified to work with it. This wiring is dull gray, not the dull orange that's characteristic of copper.
Subscribe to:
Comments (Atom)
Memory and storage are often confused. It is important to know the difference, because they perform different functions.
As an example, think of your device as an office. The internal storage (ROM) is your file cabinet. You store files in the cabinet, but you would not read or edit them there. You take files that you are using out of the file cabinet, and put them on your desk. The desk is like your internal memory (RAM), where you are using files.
Internal memory (RAM) : Internal memory (RAM) is where your running runs apps and open docs are. It is short term memory. When you restart your device or stop an app, it is no longer in memory (RAM).
What happens when it is low? If you run out of internal memory, then Android may close apps, slow down, or cause errors.
Internal storage (ROM) : Internal storage (ROM) is where your device stores app data and the operating system files it needs to keep. It is long term memory. When you restart your device or stop an app, all saved information is still in the storage.
What happens when it is low? If you run out of internal storage, you may have problems saving and reading files, and may even make some apps not function correctly.
Perform the following steps as regular maintenance for internal storage (ROM):
Clear storage regularly
Clear the storage at least once a week:
Note: Refer to your user manual for instructions.
Check the available internal device storage. It must be over 25 MB for all versions up to Android 3.1 or over 150 MB for Android 4.0+.
Note: If it is less, the Android system cannot work properly. You must clear more storage and delete more apps using the following tips.
Delete unnecessary text messages (SMS) and picture messages (MMS).
Transfer pictures and media to a computer, and remove it from the phone memory.
Clear the browser cache, cookies, or history.
Clear Facebook app cache.
Manage applications. See section below.
Delete the call logs.
Set the device to manage some memory
Prevent the storage from being filled as quickly:
Set the text message limit to delete messages automatically.
Note: The default is 200 text and 20 picture messages. You may use this setting to start with, and decrease it if you continue to have problems.
Change the setting for email synchronization to download only for the past three days.
Manage applications
Keep managing any applications that you install to keep the system running properly:
If you notice the device having some problems and you installed apps in the past few days, then uninstall all the new apps. Most device problems are actually caused by app errors.
View other applications that are using storage or memory:
When in Manage Applications settings, press Menu. Some devices may require you select All first to view all applications.
Touch Sort by size.
For apps that take up a lot of space, clear the application cache and data.
For apps that continue to use a lot of your storage space, uninstall them by touching the app name, then Uninstall.
Move some apps to the SD card or storage partition.
Note: Do not move: live wallpaper, widget apps, apps that use the notification bar, or apps that synchronize online. Some apps may not work correctly from SD card. Move unstable apps back to internal memory or upgrade to a new SD card (class 6 or above).
Perform the following steps as regular maintenance for internal memory (RAM):
Restart the device regularly
You should restart the phone at least once a day:
Press and hold the Power key.
Touch Restart (if available) or Power Off.
If necessary, press the Power key to turn the device back on.
Reduce memory use
Prevent the memory from being filled as quickly:
If the device is slow, remove the widgets from Home screens (especially ones that update with information or have animation).
If you are using live wallpaper and the device is slow, turn off the live wallpaper.
Remove all unused Home screens:
Pinch the Home screen.
On the grid of Home screens, drag unused screens to the trash.
Note: These things can both drain your battery faster and make your device run slower, or cause crashes in all apps.
Manage applications
Keep managing any applications that you install to keep the system running properly:
If you notice the device having some problems and you installed apps in the past few days, then uninstall all the new apps.
Keep your apps updated. Open the Play Store while you have a data connection, and it will check for updates.
Read reviews of your apps in the Play Store. Not all apps work well with all phones. Read the customer reviews to see if other people complain about the app not working.
Manage or remove apps that run in the background. Background apps use up device resources.
Restart the phone.
In Settings, go to Apps or Application manager, and then Running.
Examine the list of apps running in the background. View applications that are running in memory, and either:
Uninstall the third-party apps
Clear the application cache
Task and battery managers:
Android 4.0 and later include a task manager you can use to close running apps. Open the recent apps screen, and manage your apps listed.
Note: Some older devices include a pre-installed task manager, which you can access from the applications menu.
Most Android phones can manage applications from the Settings menu.
Never install third-party task managers, battery managers, or apps that close and end running processes. They interfere with how Android works.
Note: If you have installed a task manager, then uninstall it.
For devices with limited storage (ROM)
Some devices have a limited amount of storage space (example: G1, myTouch 3G, Wildfire S, Gravity SMART, etc.). These devices may show signs of low memory when the storage fills up.
Does deleting messages and call logs help free up memory?
No. Messages and call logs are stored in the internal storage. Clearing them will only affect memory problems when the Messaging app is running.
It will not help the memory if the Messaging app is not running, but it will help if the internal storage is full or corrupted.