The popular way to downloading apps for kindle fire by amazon.com apps store. but you can download apps from http://apkforkindlefire.com
Aldo another links are
getjar.com
mobilestore.opera.com
handango.com
Sonic Micro system is your technological supporter. We are selling Tablets, Laptops ,and pcs also parts and accessories. Our Website: https://sites.google.com/site/sonicpcsale Email:sonicpcmat@yahoo.com Sonicpcmatara@sltnet.lk Phone: 0094722814306
Friday, December 9, 2016
Saturday, October 22, 2016
Reduce Activity of Hard drive your pc or laptop
Speed up your pc with reduce hard drive usage.
Time to time slowing your pc when you using windows 7 ,8 ,8,1 ,or 10.There may be several reasons cause for slow down the pc or laptop.
1, CPU Usage
2. RAM Usage
3. Storage usage
You can find what happening ,Which part accessing 100% by view Task Manager.
Press [Ctrl]+[Alt]+[Del] to bring up the Windows Security screen, which provides users with five options including Windows Task Manager.
Just click Start Task Manager. Right-click the task bar and you'll see the context menu. Then, just choose the Start Task Manager command.


Before checking viruses or after checking drive partition errors by chkdsk utility. There are 3 methods to reduce the hard drive usage.
1. Disable the Windows 10, 8, or 7 Superfetch
Enable or disable the Windows 10, 8, or 7 Superfetch (otherwise known as Prefetch) feature. Superfetch caches data so that it can be immediately available to your application. Sometimes this can affect the performance of certain applications. It tends to not work well with gaming, but can improve performance with business apps.
To modify whether Superfetch is enabled or disabled, you can perform the following steps.
Disable from Services
- Hold the Windows Key, while pressing “R” to bring up the Run dialog box.
- Type “services.msc“, then press “Enter“.
- The Services window displays. Find “Superfetch” in the list.
- Right-click “Superfetch“, then select “Properties“.
- Select the “Stop” button if you wish to stop the service. In the “Startup type” dropdown menu, choose “Disabled“.
Enable or Disable from Registry
- Hold the Windows Key, while pressing “R” to bring up the Run dialog box.
- Type “Regedit“, then press “Enter“.
- The Registry Editor window appears. Navigate to the following location in the Registry.
- HKEY_LOCAL_MACHINE
- SYSTEM
- CurrentControlSet
- Control
- Session Manager
- MemoryManagement
- PrefetchParameters
- On the right side, double-click on “EnableSuperfetch“. If this value doesn’t exist, right-click the “PrefetchParameters” folder, then choose “New” > “DWORD Value“.
- Give “PrefetchParameters” one of the following values:
- 0 – to disable Superfetch
- 1 – to enable prefetching when program is launched
- 2 – to enable boot prefetching
- 3 – to enable prefectching of everything
- Select “OK“.
- Close the Registry Editor.
2. Dissable by net service
Using NET to stop a Windows Service
To stop a service, run:net stop <Service-Name>c:\>net stop "windows Search"
Starting a Windows Service with NET
To start an idle Windows Service, run:net start <Service-Name>c:\>net start "windows Search"
To stop this, and prevent it from happening during your current session (until Windows is rebooted) open the Command Prompt (the quickest way is by right-clicking the Start button and selecting Command Prompt (Admin)) and enter the following:
c:\>net stop "windows Search"
c:\>net stop superfetch
3. Stop BITS (Background Intelligent Transfer Service)
Services.msc:
This method shows you how to Start/Stop Background Intelligent Transfer from Services.msc
Please perform the following steps:1. Select Start and select run
2. Type services.msc
3. find Background Intelligent Transfer Service

From General tab you can Start/Stop and change the Startup type of Background Intelligent Transfer
To finish press ok button and close Services window
Those changes affecting to reduce the usage of hard d rive therefore remain the bandwidth for data transferring . Also reduce the wear of the drive access arm and reduce drive faults.
Monday, August 22, 2016

Can we fix dell 3521 mother board short cuircuit repair?
How can find the where is short and how to fix it.
 Remove the PR102. no ac adapter light off. but I can't understand where is the problem, section may be B+ or in PU100.?
Can we fix dell 3521 mother board short cuircuit repair?
How can find the where is short and how to fix it.
Remove the PR102. no ac adapter light off. but I can't understand where is the problem, section may be B+ or in PU100.?
Can we fix dell 3521 mother board short cuircuit repair?
How can find the where is short and how to fix it.
Remove the PR102. no ac adapter light off. but I can't understand where is the problem, section may be B+ or in PU100.?
Friday, July 22, 2016
Turn Recovery mode on for sony ericson phones

xperia x10
(turn the phone on while holding the back button)
xperia x10 mini
(Press BACK button few times right after white SE
logo appears.)
xperia x10 mini pro
(boot up phone.as soon as display is on press the back key many time till you enter recovery)
xperia x8
(Turn phone on, while holding power button and pressing back button many times)
xperia arc
( reboot
your device and press the Volume Down key
when the Sony Ericsson logo appears when the
notification LED turns blue.)
xperia arc s
(power plus vol down)
xperia play
(Turn device off. When off, press the power button,
and start tapping the back button untill device boots
into recovery)
xperia neo v
(Volume Up and Volume Down keys and then
pressing the Power Key until u boot to recovery)
sony tablet s
(Hold down power and volume up button..when SONY logo appears, release power button
but keep pressing volume up button until it loads into recovery)
xperia mini
(Now start the phone. When you see the free xperia
logo, keep pressing volume down until recovery
menu appears. )
xperia mini pro
(Press the Power button and while the device is rebooted, press the Volume
Rockers a few times to boot into the
Recovery. )
xperia active
(currently unavailable,flash rom thru fastboot)
xperia ray
(press the volume down key a few times when your
phone boots up. The sony logo brightens at one
point, press during that time)
xperia s
(Power off the phone. Power it back
on. When you see the splash screen
and the LED light turns blue, press
the Volume Up button. This allows
you to enter Recovery Mode.)
xperia p
(at boot up keep
pressing the vol up button when you
see blue led and feel small vibration from the
device)
xperia u
(currently unavailable,flash rom thru fastboot)
xperia solar
(currently unavailable,flash rom thru fastboot)
Saturday, June 11, 2016
How to identify your Tablets Processor and Board ID
How to identify your Tablets Processor and Board ID?
The process of identifying your tablets firmware begins with knowing your Tablets Processor and board ID, believe it or not most of these entry-level Chinese tablets are usually sporting similar boards and processors for the most part, the names of the devices might change e.g. Alldaymall, Irulu, GPad or so on but beneath they are sporting similar hardware and all you have to do is find a firmware that matches the board ID and the processor or ones thats close and you can flash your tablet and have it functioning as new. The two main type of processors that you will find on your tablet are usually the A13 and A10 processors respectively.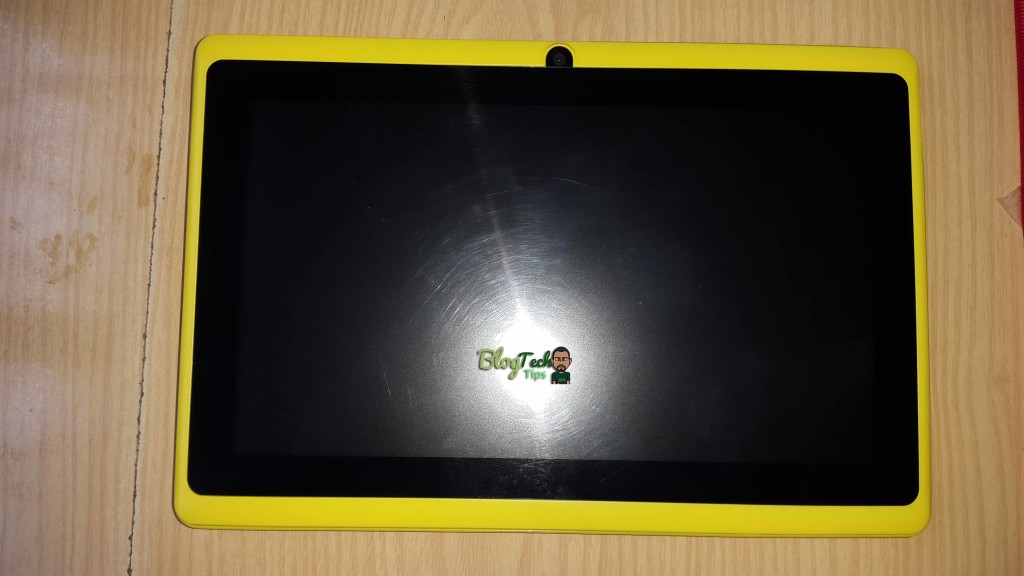
To find out both you will need to open your Tablet, do not panic it’s not as bad as it sounds trust me, here are the steps:
1. Tablets do not have screws that seal them in most cases so you will have to find the seems that hold both halves together.
2. Once you have found the seems, use a tool set such as the ones used in opening phones or a blunt object and force it into the seems,its best to start around the charge port in most cases, the parts will separate with little trouble as long as you are firm-do not break the clips that hold both halves together but separate the halves until the entire thing comes apart.You can refer to the video for details instructions.
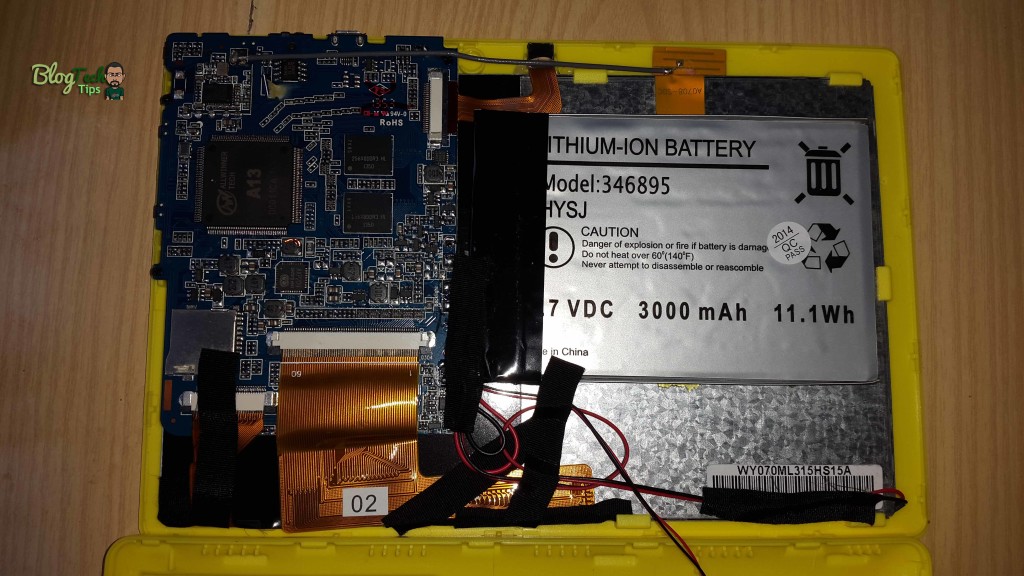
3. Once both halves separate, carefully move them apart and watch out for wires such as the one that runs from the speakers.
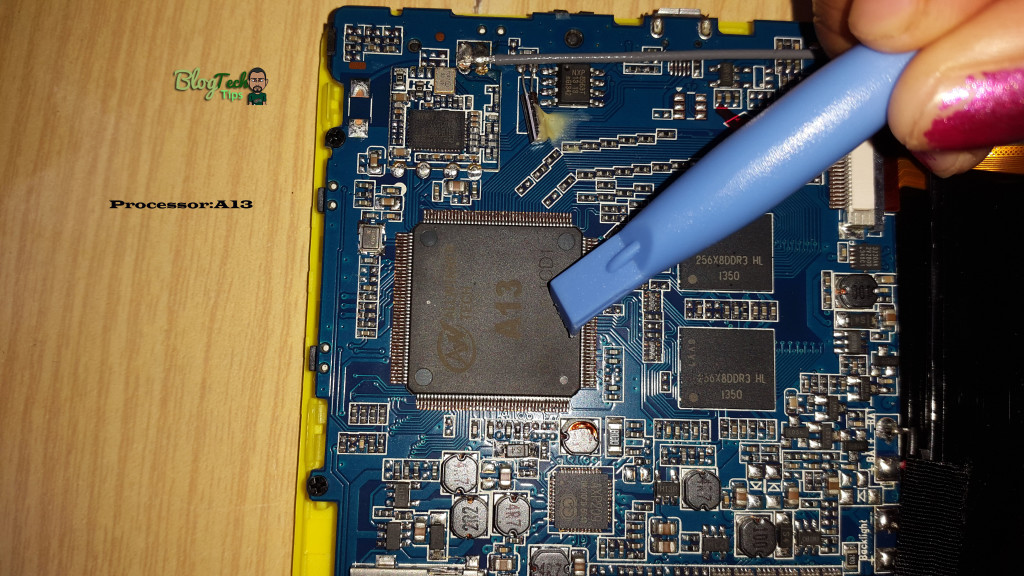
4. Look on the main part of the board and you should see a processor look out for A13 or A10 marked on them clearly:
5. Last look on the board for a number its usually at the top section and it’s clearly written, this will be your Board ID, record it:
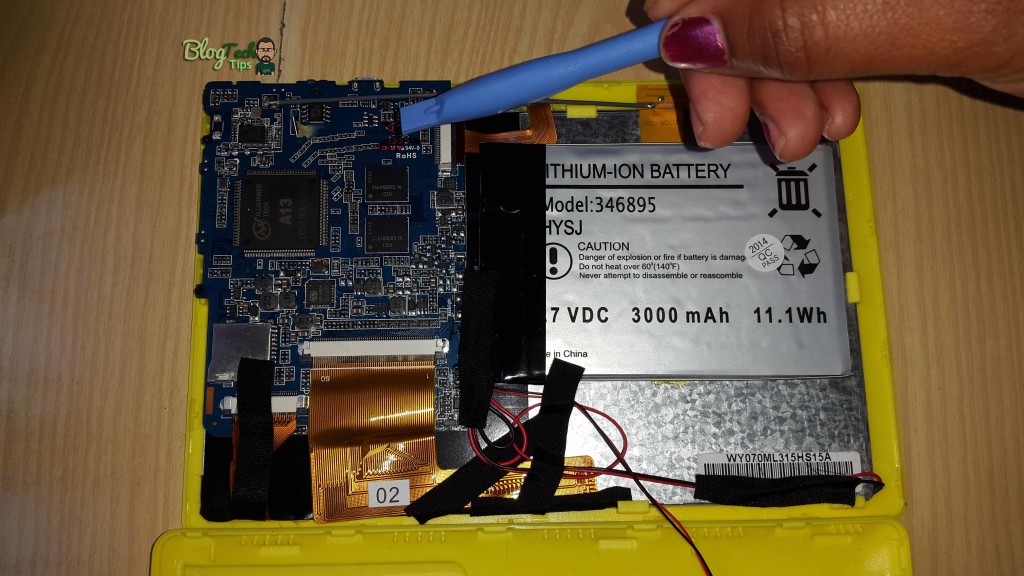
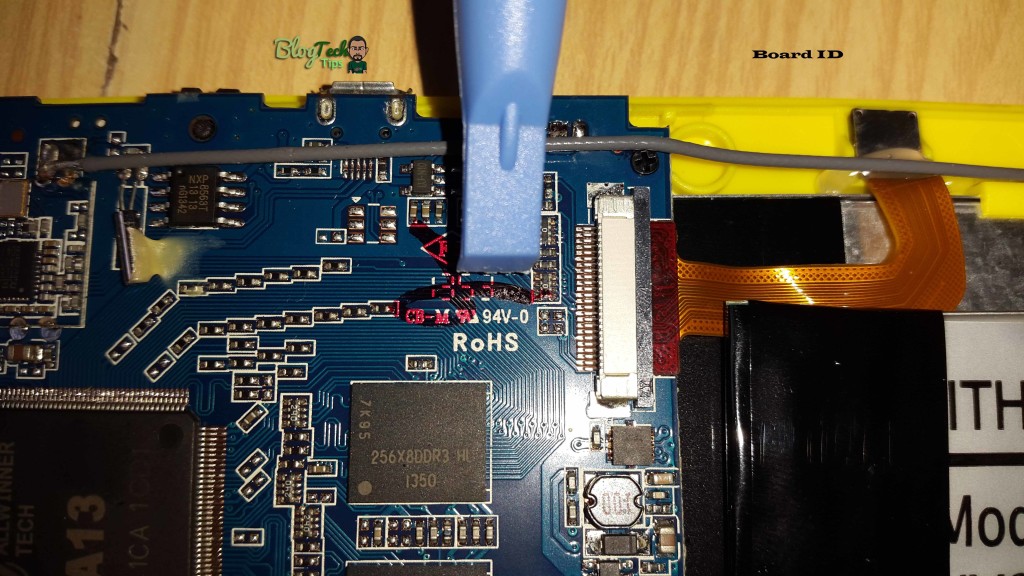
That’s it you have just found your Motherboard ID and Processor, in this case the board in the tablets ID was: CB-M RU 94V-0
The processor was: A13
So now I need to search in Google for “A13 CB-M RU 94V-0 Firmware”
Friday, June 3, 2016
BIOS Password
Laptops in general have much better hardware security than PCs. Some of them even come with fingerprint reader build in.
Most laptops come with a very strong BIOS password capability that locks up the hardware and makes the laptop completely unusable. This is the password that has to be entered before the operating system loads, usually on a black screen a few seconds after the laptop is started.
Of course BIOS password can be set on a PC too, but there it is stored together with the other BIOS settings – date, time, hard disk size, etc. It is very easy to reset the BIOS settings (and the password) on a PC – usually there is a jumper near the BIOS battery on the motherboard that needs to be moved from connecting pins 1+2 to pins 2+3 for a few seconds and than moved back to pins 1+2. Next time the PC is started it will alert you “… BIOS settings invalid… Defaults loaded… Press F1 to continue…” or something similar, and…. the password is gone!
However most laptops store the BIOS password in a special chip, sometimes even hidden under the CPU, that is not affected when the rest of the BIOS settings are reset. This makes the removal of a BIOS password on a laptop almost impossible. The only option in most cases is to replace the chip which is quite expensive and risky procedure and, of course, not supported by the manufacturers.
Some manufacturers (like Dell) can generate a “master password” for a particular laptop (from their service tag) if sufficient proof of ownership is provided. Others (like IBM) would advise replacing the laptop’s motherboard (very expensive). On some old laptops (4 – 5 years or older) the BIOS password can still be reset relatively easy, usually by shorting two solder points on the motherboard or by plugging a special plug in the printer port, etc.
In almost all cases on newer laptops it is either a big hassle, expensive or even impossible to reset the BIOS password, making it a very good way of protecting your laptop from unauthorized use.
However what makes your computer exactly yours are your own files, documents, emails, pictures, etc. They are all stored on the hard drive. So, even if your laptop has a BIOS password that locks it up and makes it completely unusable to anyone that doesn’t know it, your hard drive can still be removed from the laptop and connected to another computer, and your files retrieved quite easily.
How do I clear a laptop BIOS or CMOS password?
A laptop BIOS password is more secure than a traditional desktop to help protect the data if it was stolen. If you are the original owner of the laptop, we highly recommend contacting the manufacturer of the laptop. Companies such as Dell, Lenovo, and Toshiba can reset the password if you are the original owner using the Service Tag, disk, or give you exact steps for your laptop.
If you are not the original owner of the laptop, there are some ways to bypass the password depending on the manufacture and model of the laptop.
 5 to 8 character code on System Disabled screen
In the CMOS setup, when prompted for a password, guess three times until you're giving the code. If, after entering the wrong password three times, the computer is displaying a 5 to 8 code, as shown in the picture, continue to the next step.
Write down the code and visit Dogbert's BIOS Password Backdoors scripts page to download Python and the free Python scripts to clear many of these types of passwords.
As the computer is booting, press F1, F2, or Del to enter CMOS setup.
Clear by dip switches, jumpers, jumping BIOS, or replacing BIOS
If the above suggestions do not apply to your laptop, you need to open the laptop and clear the password using dip switches or jumpers. You may also be able to jump the BIOS using a paperclip, by soldering a wire to pins on the BIOS, or replacing the BIOS chip.
The location of dip switches or jumpers on the motherboard depends on the brand and model of your laptop. Check the technical documentation for your laptop and contact the manufacturer to determine which motherboard is in your laptop. Search the Internet for that motherboard model for a technical diagram of where components are located, including the dip switches or jumpers for resetting the BIOS.
Which step you take depends on the manufacturer and model of your laptop computer. For most end users we highly recommend having the laptop serviced by a qualified technician who can properly disassemble a laptop.
Contact laptop manufacturer
If the above steps do not help remove the CMOS password for your laptop, we suggest contacting the laptop manufacturer for steps on how to clear the password. Many manufacturers have strict policies in place to help protect their customers' laptops and only they have the information on how to clear CMOS passwords.
To try unlock code with
https://bios-pw.org/
links: http://www.computerhope.com/issues/ch001302.htm
http://www.laptoptips.ca/security/bios-password/
Subscribe to:
Posts (Atom)