Sonic Micro system is your technological supporter. We are selling Tablets, Laptops ,and pcs also parts and accessories. Our Website: https://sites.google.com/site/sonicpcsale Email:sonicpcmat@yahoo.com Sonicpcmatara@sltnet.lk Phone: 0094722814306
Saturday, November 22, 2014
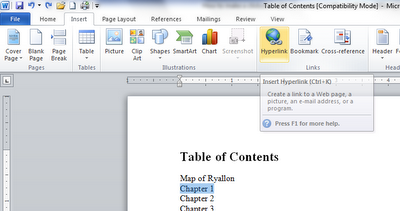
How to make a clickable table of contents in Microsoft Word
Table of Contents


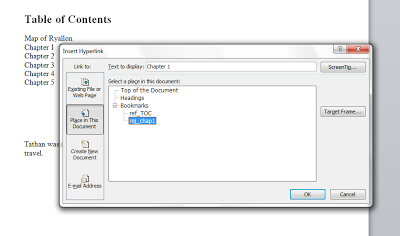
So that’s the basics. If you want to test the links, just press shift and left click the mouse. This works wonderfully on the Kindle Touch and Fire, which I’ve been able to test. I hope this helps for you too.
Friday, November 14, 2014
Flash a Custom Recovery Image on the Samsung Galaxy Tab (All Versions)
Video URL: http://www.youtube.com/watch?feature=player_embedded&v=_Yg-duhVnkY
I. Before You Begin
1. You must have done our How To Root the Samsung Galaxy Tab procedure first then come back to this one.
II. Setup ADB
1. Go to our How To Setup ADB procedure and do that until you can see the serial number when typing adb devices into the command prompt then return here to continue.
III. Flash the Custom Recovery
1. Download and extract the flash_image file and the appropriate kernel file to the AndroidSDK\tools folder (the folder from doing the how to setup ADB procedure above). All the files should be inside the same folder as adb.exe.
Flash_Image
Verizon Kernel File
Sprint Kernel File (this file says VZW but it is for Sprint, don’t worry)
T-Mobile Kernel File
International GSM Kernel File
2. On the device, go to Settings > Applications > Development > and Enable USB Debugging.
3. Plug in the device via USB cable.
4. On your device download and install ROM Manager from the Market.
5. Open it and click flash recovery and choose your device. After it is done, do NOT boot into recovery, instead continue with this procedure.
6. Open a command prompt by clicking on the Start menu and typing cmd and hitting enter in the search box.
7. Now do the rest of the procedure only within the section for your device:
A. Sprint Galaxy Tab -
1. In the command prompt type the following with hitting enter at the end of each line:
cd c:\AndroidSDK\tools
adb push flash_image /data/local/bin/flash_image
adb push zImage /sdcard/
adb shell
su
chmod 755 /data/local/bin/flash_image
/data/local/bin/flash_image boot /sdcard/zImage
sync
exit
exit
adb reboot recovery
2. Your tab should reboot into recovery, and automatically begin backing up for fs conversion but it will fail at data and cache. This is fine.
3. In recovery do Wipe Data/Factory reset, then do Wipe Cache
4. Select reboot system. It will hang on the Samsung logo, when it does, just hold both volume keys down and the power key untill it powers off.
5. With the device off, hold down volume up and power until you see the Samsung logo, when you do let go.
6. Once it boots back into recovery it will restart the backing up procedure but this time it will finish.
7. Select reboot system now.
8. Now open ROM Manager again and click Flash Recovery again, choose your Tab version and wait for it to finish.
B. Verizon Galaxy Tab -
1. In the command prompt type the following with hitting enter at the end of each line:
cd c:\AndroidSDK\tools
adb push flash_image /data/local/bin/flash_image
adb push verizon_zImage /sdcard/
adb shell
su
chmod 755 /data/local/bin/flash_image
/data/local/bin/flash_image boot /sdcard/verizon_zImage
sync
exit
exit
adb reboot recovery
2. Once it boots into recovery it will restart the backing up procedure but this time it will finish.
3. Select reboot system now.
4. Now open ROM Manager again and click Flash Recovery again, choose your Tab version and wait for it to finish.
C. T-Mobile Galaxy Tab -
1. In the command prompt type the following with hitting enter at the end of each line:
cd c:\AndroidSDK\tools
adb push flash_image /data/local/bin/flash_image
adb push tmobile_zImage /sdcard/
adb shell
su
chmod 755 /data/local/bin/flash_image
/data/local/bin/flash_image boot /sdcard/tmobile_zImage
sync
exit
exit
adb reboot recovery
2. Once it boots into recovery it will restart the backing up procedure but this time it will finish.
3. Select reboot system now.
4. Now open ROM Manager again and click Flash Recovery again, choose your Tab version and wait for it to finish.
D. International GSM Galaxy Tab -
1. In the command prompt type the following with hitting enter at the end of each line:
cd c:\AndroidSDK\tools
adb push flash_image /data/local/bin/flash_image
adb push international_zImage /sdcard/
adb shell
su
chmod 755 /data/local/bin/flash_image
/data/local/bin/flash_image boot /sdcard/international_zImage
sync
exit
exit
adb reboot recovery
2. Once it boots into recovery it will restart the backing up procedure but this time it will finish.
3. Select reboot system now.
4. Now open ROM Manager again and click Flash Recovery again, choose your Tab version and wait for it to finish.
IV. Boot into Recovery
1. To boot into recovery in the future, simply go into ROM Manager and select Reboot Recovery.
V. (Optional) Load a Custom ROM
1. Head over to our How To Load a Custom ROM on the Samsung Galaxy Tab procedure to flash a custom ROM on your device.
Thanks to Koush over on XDA for his recovery image and kernels! If you appreciate his work, please let him know or donate to him!
Thursday, November 13, 2014
Fixing the Windows Bootloader by command line
If you have dual boot system like Windows xp and Windows 7 ,
After Repaired win xp there will not showing windows 7 boot loader in your boot menu.
Because win xp boot loader was overwrite win 7 boot loader.
Therefore install older O/S and have to Repair newer windows version Bootloader and can Add older windows path to that loarder.
While installing older version first and newer version after that. newer version windows (it is usefull for other O/S like Linux) will be replace newer boot loader and keep older boot loader for access older version.
But after repair or re install older version again. problem is arise...
To Repair that...
Put your Windows setup DVD or your System Repair Disc in the drive and restart your PC.
Assuming you’ve properly configured your BIOS to boot from CDs/DVDs before hard drives (or you can press DElL , F2 to go BIOS or press F8 before end up post test .
While restart after set First Boot device as CD /DVD you should get a prompt asking you to “Press any key to boot from the CD/DVD…“
Insert Windows installation Disk DVD to DVD Rom
Ex: Windows 7 DVD
Press a key, while prompting Boot from CD ...
and the CD will begin to load.
After loaded Windows Installation setup
, you’ll see a dialog asking you want to Install Now, or in the lower left corner, an option to “Repair your Computer,” which you’ll want to click.
If you’re using our recovery CDs, just go on to the next section. If you’re having problems booting from the CD pls follow instruction with your BIOS.After selecting your language, the recovery CD will scan for operating systems on your drive.
Select the operating system to repair from the list displayed on the screen, then press next to continue. Depending on which version of the CD you’re using, you’ll see a welcome screen like the ones below:

pls select Repair

When running automatic process and showing it as fixed and restart. Don't Restart.

pls select advance recovery tools or cancel. After Display tools pls select Command Line.

Pls type the command
bootsect /nt60 c: /force /mbr
bcdboot c:\windows /s c:
What these commands do:
Writes a new mbr to c:
bootsect /nt60 c: /force /mbr
( command, /nt60 = use boot code that is compatible with BOOTMGR, / = force dismount, / = write mbr )
( bootsect does to touch mbr, it works on the selected drives…ahem….wait for it…bootsector)
Write a new bootloader to the C: drive
bcdboot c:\windows /s c:
( command, look in c:windows for files, copy files to c: (actually c:\windows\boot) )
If not Fixed pls type the drive that showing your DVD
Ex:
D:
D is my DVD Rom (Win 7 DVD in the Drive.
You can confirm it by this picture . There are Boot Folder , Boot mgr and Setup.exe files and folders in the DVD.
you can type this command to fix boot loader.
D:\> D:\boot\bootsect.exe /nt60 all
You will see showing the Msg after run the command " Successful "
Restart the PC
The Pc will boot in Windows 7 .
Now you can Add Windows Xp Boot line to Wi9ndows 7 Boot loader
Select RUN in Start Menu.
Type CMD
Right click on CMD.Exe and press Run as Administrator
Type following Command
bcdedit /create {ntldr} /d "Windows XP"
if showing boot menu is already exit pls type bellow commnds
bcdedit /set {ntldr} device partition=D:
after that
bcdedit /set {ntldr} path \ntldr
after that
bcdedit /displayorder {ntldr} /addlast
Also you can use EasyBCD free software to add xp boot line
select Add Entry
select windows xp /2000/...
enable check box for Determine Drive automatically
and select ok
For dual-booting and other boot related projects I use EasyBCD.
I highly recommend you check out this FREE program.
Dual-booting as well as bcd backup and repair are just some of the things you can do.
Link: https://neosmart.net/wiki/easybcd/tips-and-tricks/recovering-windows-bootloader/
Also you can use this command to fix "fatal error one more table pointers are invalid"
by
bootsect.exe /nt60 ALL /force
Tuesday, September 23, 2014
Flash Controller Part-Number: Unknown(??) Pen Drive
You can Flash pen drive with unknown chip number with Flash tool for Alcor mp controller.
Ex:
Controller Vendor: Alcor Micro
Controller Part-Number: Unknown(??) - 0xE512 - F/W FF00
Flash ID code: 45DE9493 - SanDisk - 1CE/Single Channel [MLC] -> Total Capacity = 8GB
Go to http://flashboot.ru/forum/
And download software for chip number if you have it .
Pls run cgip genius and view chip number

Ex: Kingston DT 101 G2 (8GB)
Controller Vendor: Phison
Controller Part-Number: PS2251-60(PS2260) - F/W 01.01.50 [2010-11-25]
Flash ID code: 8988285F - Intel JS29F64G08AATE1 [TLC-8K]
This is controller ( PS2251-60(PS2260))
If not shown
Ex: Controller Vendor: Alcor Micro
Controller Part-Number: Unknown(??) - 0xE512 - F/W FF00
Flash ID code: 45DE9493 - SanDisk - 1CE/Single Channel [MLC] -> Total Capacity = 8GB
Controller Part-Number: Unknown(??)
Therefore we know Vendor: Alcor Micro
find controllers for ID code 45DE9493 - SanDisk or All Alcor
You can download tool by http://flashboot.ru and Run.
Plug the flash Drive
if detect you can start to lolevel format. if not try another one.

good luck
Saturday, September 20, 2014
Getting Better Battery Life from Your Smartphone
Getting Better Battery Life from Your Smartphone
As technology continues to improve in the wireless industry, cell phones and tablets are doing much more in less time. We have the ability to make payments, unlock applications through fingerprint scanners, and read barcodes from our mobile phones. Take a guess at how many applications are available through all the app markets...over 1.7 billion! So our phones have more functionality, access to more applications, transmit more data, have better processors, and run faster upload & download speeds, but one thing hasn’t improved – battery life.
As phone technology has developed at an amazing rate, battery life seems to have gotten worse. My iPhone 5S battery seems to have about half the life of my iPhone 4, which I was using 4 years ago. And compared to the flip-phone I used 8 years ago, where a full charge would last days, new 4G phone batteries can be dead after hours of heavy use. This is no shocker, as phones are doing more and transmitting data at all times, but here are some tips to help save battery life when you need it.
Set the “sleep mode” on your phone to 1-2 minutes. When your phone’s screen is turned off, it’s using much less battery.
Turn the backlight brightness down. If the screens brightness is turned all the way up, you’re using more battery while your phone is turned on.
Kill background apps when they’re not being used. If you just were using Waze, the CNN app, or google maps, programs will continue to run in the background. You can kill these apps after your done using them, and it will help to save on battery life.
Perform backups at night, using wifi, when your phone is on the charger. Backups through gmail, icloud, Verizon cloud, and backup assistant use a good amount of battery life, especially when it’s done on your service provider’s network. Set automatic backups to run on wifi, and do them when you’re phone is normally on a charger (i.e. in the middle of the night).
If you’re really in a pinch to conserve battery life, turn off wireless data for your applications. Almost all aps transmit data, even when the applications are not open and being used. You can turn off data to applications, or you limit the data to wifi.
Don’t worry about waiting until your battery is dead to charge it. Phone batteries are typically lithium-ion these days. The old rule, waiting until your phone is dead to charge it, no longer applies. It’s good to occasionally let it fully run down before charging it, but don’t worry about doing it every time. If you expect to use your phone a lot, or you need as much battery as possible, fully charge it regardless of how much battery life you have left.
If you’re in a remote area with bad coverage, turn off the data and cellular signals. Your phone is going to spend a lot of effort and battery life trying to find a signal, and if the coverage is really bad, you probably won’t get a signal anyway. Restrict the data and cellular signal, or put the phone in airplane mode, and you’ll have some battery life left when your back in service and need it.
Things like GPS apps, streaming video, and streaming music will deplete your battery life quickly. Anything that constantly relies on data transmission will use up the battery faster than normal.
Choose the right phone. If battery life is extremely important to you on a daily basis, look into phones that come with extended batteries. Phone like the Droid Maxx, LG G2, and the HTC One Maxx all have larger stock batteries for better life.
Extended batteries and external chargers. Aside from a few phones with internal batteries (i.e. iPhones and some Android devices), most phones have an extended battery which will provide longer battery life. It is even possible to put en extended battery in an iPhone or android phone with an internal battery, although it’s a lot of work and it may void the manufacturing warranty. In additional to extended batteries, you can purchase an external, portable battery pack.
These are very common and I use on all the time. Anytime I travel, or know that I won't have access to a power source (car or home), I bring my portable charger with me. They are small, have mulitple connection ports for different devices, and can fully charge a device 1-3 times depending on the portable charger.
Thursday, September 4, 2014
Flash a Custom Recovery Image on the Samsung Galaxy Tab (All Versions)
Video URL: http://www.youtube.com/watch?feature=player_embedded&v=_Yg-duhVnkY

I. Before You Begin
1. You must have done our How To Root the Samsung Galaxy Tab procedure first then come back to this one.
II. Setup ADB
1. Go to our How To Setup ADB procedure and do that until you can see the serial number when typing adb devices into the command prompt then return here to continue.
III. Flash the Custom Recovery
1. Download and extract the flash_image file and the appropriate kernel file to the AndroidSDK\tools folder (the folder from doing the how to setup ADB procedure above). All the files should be inside the same folder as adb.exe.
Flash_Image
Verizon Kernel File
Sprint Kernel File (this file says VZW but it is for Sprint, don’t worry)
T-Mobile Kernel File
International GSM Kernel File
2. On the device, go to Settings > Applications > Development > and Enable USB Debugging.
3. Plug in the device via USB cable.
4. On your device download and install ROM Manager from the Market.
5. Open it and click flash recovery and choose your device. After it is done, do NOT boot into recovery, instead continue with this procedure.
6. Open a command prompt by clicking on the Start menu and typing cmd and hitting enter in the search box.
7. Now do the rest of the procedure only within the section for your device:
A. Sprint Galaxy Tab -
1. In the command prompt type the following with hitting enter at the end of each line:
cd c:\AndroidSDK\tools
adb push flash_image /data/local/bin/flash_image
adb push zImage /sdcard/
adb shell
su
chmod 755 /data/local/bin/flash_image
/data/local/bin/flash_image boot /sdcard/zImage
sync
exit
exit
adb reboot recovery
2. Your tab should reboot into recovery, and automatically begin backing up for fs conversion but it will fail at data and cache. This is fine.
3. In recovery do Wipe Data/Factory reset, then do Wipe Cache
4. Select reboot system. It will hang on the Samsung logo, when it does, just hold both volume keys down and the power key untill it powers off.
5. With the device off, hold down volume up and power until you see the Samsung logo, when you do let go.
6. Once it boots back into recovery it will restart the backing up procedure but this time it will finish.
7. Select reboot system now.
8. Now open ROM Manager again and click Flash Recovery again, choose your Tab version and wait for it to finish.
B. Verizon Galaxy Tab -
1. In the command prompt type the following with hitting enter at the end of each line:
cd c:\AndroidSDK\tools
adb push flash_image /data/local/bin/flash_image
adb push verizon_zImage /sdcard/
adb shell
su
chmod 755 /data/local/bin/flash_image
/data/local/bin/flash_image boot /sdcard/verizon_zImage
sync
exit
exit
adb reboot recovery
2. Once it boots into recovery it will restart the backing up procedure but this time it will finish.
3. Select reboot system now.
4. Now open ROM Manager again and click Flash Recovery again, choose your Tab version and wait for it to finish.
C. T-Mobile Galaxy Tab -
1. In the command prompt type the following with hitting enter at the end of each line:
cd c:\AndroidSDK\tools
adb push flash_image /data/local/bin/flash_image
adb push tmobile_zImage /sdcard/
adb shell
su
chmod 755 /data/local/bin/flash_image
/data/local/bin/flash_image boot /sdcard/tmobile_zImage
sync
exit
exit
adb reboot recovery
2. Once it boots into recovery it will restart the backing up procedure but this time it will finish.
3. Select reboot system now.
4. Now open ROM Manager again and click Flash Recovery again, choose your Tab version and wait for it to finish.
D. International GSM Galaxy Tab -
1. In the command prompt type the following with hitting enter at the end of each line:
cd c:\AndroidSDK\tools
adb push flash_image /data/local/bin/flash_image
adb push international_zImage /sdcard/
adb shell
su
chmod 755 /data/local/bin/flash_image
/data/local/bin/flash_image boot /sdcard/international_zImage
sync
exit
exit
adb reboot recovery
2. Once it boots into recovery it will restart the backing up procedure but this time it will finish.
3. Select reboot system now.
4. Now open ROM Manager again and click Flash Recovery again, choose your Tab version and wait for it to finish.
IV. Boot into Recovery
1. To boot into recovery in the future, simply go into ROM Manager and select Reboot Recovery.
V. (Optional) Load a Custom ROM
1. Head over to our How To Load a Custom ROM on the Samsung Galaxy Tab procedure to flash a custom ROM on your device.
Thanks to Koush over on XDA for his recovery image and kernels! If you appreciate his work, please let him know or donate to him!
Saturday, August 23, 2014
Windows 8/8.1 How to refresh, reset, or restore your PC
How to refresh, reset, or restore your PC
If you're having problems with your PC, you can try to refresh,
reset, or restore it. Refreshing your PC reinstalls Windows and keeps
your personal files and settings. It also keeps the apps that came with
your PC and the apps you installed from the Windows Store. Resetting
your PC reinstalls Windows but deletes your files, settings, and
apps—except for the apps that came with your PC.
Restoring your PC is a way to undo recent system changes you've
made.
If you want to back up and restore your personal files using File History, see Set up a drive for File History If you want to restart your PC, see Shut down (turn off), sleep, or hibernate your PC.
Before you start to refresh or reset your PC
In most cases, once you start to refresh or
reset your PC, it’ll finish on its own. However, if Windows needs
missing files, you’ll be asked to insert recovery media, which is
typically on a DVD disc or thumb drive. If that happens, what you’ll
need depends on your PC.
If your PC came with Windows 8.1 or Windows RT 8.1,
you’ll need the discs or thumb drive that came with your PC. Check the
info that came with your PC to see if your PC manufacturer provided
these discs or media. In some cases, you might have created them when
you first set up your PC.
If you upgraded your PC to Windows 8.1 or Windows RT 8.1 with a DVD, use that disc. If you don’t have Windows 8.1 or Windows RT 8.1 media, contact Microsoft Support.
To refresh your PC
-
Swipe in from the right edge of the screen, tap Settings, and then tap Change PC settings.
(If you're using a mouse, point to the upper-right corner of the screen, move the mouse pointer down, click Settings, and then click Change PC settings.) -
Tap or click Update and recovery, and then tap or click Recovery.
-
Under Refresh your PC without affecting your files, tap or click Get started.
-
Follow the instructions on the screen.
Subscribe to:
Posts (Atom)