Monday, January 14, 2019

Repair Battery Plugged in not charging on Laptop Specially Toshiba.

Toshiba C660 Laptop is a good laptop .better performance with Core I3 3rd gen processor. 4GB RAM and 500GB Hard drive.


There was a problem  with charging section of the laptop.

Symptoms are when plugged the charger ,Battery light was ON in Orange color. but not chargin and Battery light turned off. .when Power on and showing as Plugged in Charging .... when 1 min ... showing as plugged in not charging...


. Battery light is on on as Orange. or Green. When you Removing the battery Battery light is on as Green. (When Fully charged the Battery Light is turned ON As Green.

In very first you have to check the battery voltage need to match as 10.8V. You can test with Voltage section of the Multimeter. (Remove the AC Adapter of the Laptop Before Check the voltage.
Check the Mos-fet in power section of the mother board.

Down side of the Mother Board, Near the
Check the mosfet connectivity by multimeter.
IF connectivity  or ohm test 0ohm or 1 to10 ohm need to remove the mosfet
Remove the item by using revoke station


Measurements with Plugged BATTERY AND Ac Adapter

Plug the battery and AC Adapter to mother board and test with multimeter.


PQ208- Left Side 12.0 to 12.8. Not(18.5V or 19V )
PQ208- Right Side 18.5 to 19.5V
PQ201  -Down side 18.5V to 19.5V
PQ201 Up side 3.5V -12.5V
PQ 202 up side 3.5V - 12.5V
PQ 202 Down side )0V

PQ203 .19.5V-other side 18.5V
PQ204  18.5 V and other side )0V

IF Measurements both sife of PQ208 voltage are 19V or 18.5 .and PQ201 are same you have to check mosfets after remove the mother board


Test the mosfet using Multimeter
Set diode section or contact test section and short the probe + to middle pin of one side and short middle pin of mosft by - Probe of multimeter. test both directions (probe + to up side and - Probe downside)of mosfet Picture
measurement .400 - 500 ohm one side and no result of opposite direction. (Probe - up side of mosfet and Probe + to down side of the mosfet picture)

If result is beep of one side or both side ,Attention to bad mosfet(need to replace the mosfet)

If you can't find the mosfet (original Number EX: AO4435L) .
Go to https://alltransistors.com/
and type of original numbe in search bar and search...
look Transistor Equivalent Substitute link and find sutable number and chart box to check specifications

Ex: AO4466L

Specification of Original Item.
Find suable one by check full list in web site.

Resold the parts carefully.

Pls before remove the item,please Draw the item diagram or download service manual for number of the board.
Ex: LA-7202P

Monday, May 15, 2017

Install and recovery apple lap os

About macOS Recovery

The utilities in macOS Recovery help you restore from Time Machine, reinstall macOS, get help online, repair or erase a hard disk, and more.
macOS Recovery is part of the built-in recovery system of your Mac. You can start up from macOS Recovery and use its utilities to recover from certain software issues or take other actions on your Mac.

How to use macOS Recovery

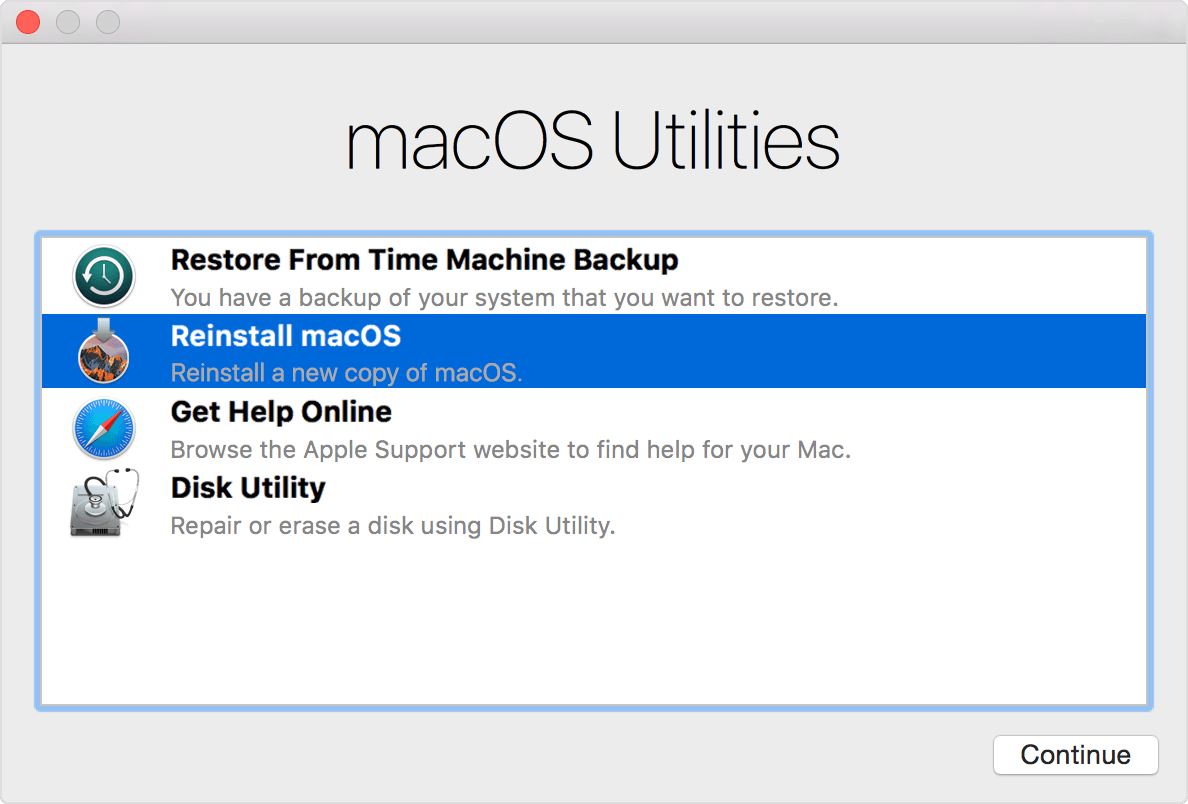
Hold down Command-R or one of the other macOS Recovery key combinations on your keyboard immediately after pressing the power button to turn on your Mac, or immediately after your Mac begins to restart. Continue holding until you see the Apple logo or a spinning globe. Startup is complete when you see the utilities window:
macOS Utilities window
After starting up from macOS Recovery, select from these utilities, then click Continue:
Restore From Time Machine Backup: Restore your Mac from an external hard drive or Time Capsule that contains a Time Machine backup of your Mac.
Reinstall macOS (or Reinstall OS X): Download and reinstall the Mac operating system.
The Reinstall macOS utility installs different versions of macOS depending on the key combination you used while starting up. For details, see How to reinstall macOS.
Get Help Online: Use Safari to browse the web and find help for your Mac. Links to Apple's support website are included. Browser plug-ins and extensions are disabled.
Disk Utility: Use Disk Utility to repair or erase your startup disk or other hard disk.
These additional utilities are available from the Utilities menu in the menu bar:
To quit macOS Recovery, choose Restart or Shut Down from the Apple () menu. If you want to choose a different startup disk before quitting, choose Startup Disk from the Apple menu.

If you can't start up from macOS Recovery

Newer Mac computers and some older Mac computers automatically try to start up from macOS Recovery over the Internet when unable to start up from the built-in recovery system. When that happens, you see a spinning globe instead of an Apple logo during startup. To manually start up from macOS Recovery over the Internet, hold down Option-Command-R or Shift-Option-Command-R at startup.
If you still can't start up from macOS Recovery, and you have a Mac that is able to start up completely, you might be able to create an external Mac startup disk to start up from instead.
macOS Recovery over the Internet, the Reinstall macOS utility, and the Get Help Online utility all require an Internet connection. If you need to connect to a Wi-Fi network, move your pointer to the top of the screen, then choose a network from the Wi-Fi status menu 


 ------------------------------------------------------------
power on and press  Command +R for recovery menu.
Select recovery from time machine backup

Mac Start up scheme
ALT + Option

Shift key Safe boot

Command + Option +R
Wifi  menu
Password
Download the software and install


Thursday, April 13, 2017

Unable to refresh or reset PC after Automatic Repair fails in Windows 8

Symptoms

Consider the following scenario:
  • You have Windows 8 or Windows 8 Pro installed on your PC.
  • Your PC fails to boot into Windows and launches Automatic Repair to attempt to repair Windows.
  • Automatic Repair is unable to repair your PC and you select "Advanced options".
  • After selecting "Troubleshoot", you choose to either "Refresh your PC" or "Reset your PC".

In this scenario, recovery may fail and you are returned back to the main WinRE screen.

Cause

This issue may occur if the System or Software registry hives have become damaged or corrupted.

Resolution

To attempt to resolve this issue, follow the steps below.

NOTE: Following these steps should only be used if you are attempting to use the "Refresh your PC" or "Reset your PC" options in Windows RE because your system is in a non-bootable state.
  1. After Automatic Repair fails to repair your PC, select "Advanced options" and then "Troubleshoot".
  2. Select "Advanced options" and then select "Command Prompt".
  3. If prompted, enter in the password for the user name.
  4. At the Command Prompt, go to the \windows\system32\config folder by typing the following command: cd %windir%\system32\config.
  5. Rename the System and Software registry hives to System.001 and Software.001 by using the following commands:
    ren system system.001
    ren software software.001

    NOTE: Renaming the Software hive will not allow you to use the "Refresh your PC" option. If you want to use the "Refresh your PC" option, only rename the System hive. If the Software hive is also corrupt, you may not be able to use the "Refresh your PC" option.
  6. Type "exit" without the quotes to exit the Command Prompt and reboot the PC back to the Automatic Repair screen.
  7. After selecting "Advanced options" and then "Troubleshoot", select either "Refresh your PC" or "Reset your PC".

More Information

Using the "Reset your PC" option will remove all of the files on your hard drive and resets your PC back to the version of Windows 8 that was preinstalled by the OEM on your PC. All new applications that were installed on your PC after you purchased it will need to be reinstalled.

How find compatible electronic Parts

We have big problem about compatible electronic parts for repair electronic circuits. therefore we need to know or follow the data sheet or book for compatible part if there no named part .

These are few web site for find component easily .

Ex:
M3004D mosfet


https://geosquare.in/CHINA-country/M3004d-mosfet.htm


Here is the listing from daily list of import records released by government of India for the keyword `M3004d mosfet` imported from China .

As per our records it was last imported on 09 Nov 2016 at under HS code 85412900 with quantity 6150 as TRANSISTOR PART NO. 192802 STD3NK50Z-1 TRANS MOSFET N-CH 500V 2.3A from CHINA at the price of Rs.10.36

The items with the keyword `M3004d mosfet` is commonly imported under the name like TRANSISTOR PART NO.10106072 SThttp://pdf1.alldatasheet.net/datasheet-pdf/view/24500/STMICROELECTRONICS/P7NB80FP.htmlD7NM60N MOSFET 800V 0.95 OHM, TRANSISTOR PART NO. 192802 STD3NK50Z-1 TRANS MOSFET N-CH 500V 2.3A, 781-SIR426DP-GE3 LQF-MSIR426D-S17 SIR426DP-T1-GE3 - VISHAY MOSFET.

The average import price of items with keyword `M3004d mosfet` is Indian Rupees 444.


http://www.findchips.com/search/IRF9Z34N 


Friday, December 9, 2016

Another way to download apps for kindel fire

The popular way to downloading apps for kindle fire by amazon.com apps store. but you can download apps from http://apkforkindlefire.com

Aldo another links are
getjar.com
mobilestore.opera.com
handango.com


Saturday, October 22, 2016

Reduce Activity of Hard drive your pc or laptop


Speed up your pc with reduce hard drive usage.
Time to time slowing your pc when you using windows 7 ,8 ,8,1 ,or 10.There may be  several reasons cause for slow down the pc or laptop.
1, CPU Usage
2. RAM Usage
3. Storage usage

You can find what happening ,Which part accessing 100% by view Task Manager.

Press [Ctrl]+[Alt]+[Del] to bring up the Windows Security screen, which provides users with five options including Windows Task Manager

Just click Start Task Manager. Right-click the task bar and you'll see the context menu. Then, just choose the Start Task Manager command.


 Before checking viruses or after checking drive partition errors by chkdsk utility. There are 3 methods to reduce the hard drive usage.

1. Disable the Windows 10, 8, or 7 Superfetch


Enable or disable the Windows 10, 8, or 7 Superfetch (otherwise known as Prefetch) feature. Superfetch caches data so that it can be immediately available to your application. Sometimes this can affect the performance of certain applications. It tends to not work well with gaming, but can improve performance with business apps.
To modify whether Superfetch is enabled or disabled, you can perform the following steps.

Disable from Services

  1. Hold the Windows Key, while pressing “R” to bring up the Run dialog box.
  2. Type “services.msc“, then press “Enter“.
  3. The Services window displays. Find “Superfetch” in the list.
  4. Right-click “Superfetch“, then select “Properties“.
  5. Select the “Stop” button if you wish to stop the service. In the “Startup type” dropdown menu, choose “Disabled“.

Enable or Disable from Registry

  1. Hold the Windows Key, while pressing “R” to bring up the Run dialog box.
  2. Type “Regedit“, then press “Enter“.
  3. The Registry Editor window appears. Navigate to the following location in the Registry.
    • HKEY_LOCAL_MACHINE
    • SYSTEM
    • CurrentControlSet
    • Control
    • Session Manager
    • MemoryManagement
    • PrefetchParameters
  4. On the right side, double-click on “EnableSuperfetch“. If this value doesn’t exist, right-click the “PrefetchParameters” folder, then choose “New” > “DWORD Value“.
  5. Give “PrefetchParameters” one of the following values:
    • 0 – to disable Superfetch
    • 1 – to enable prefetching when program is launched
    • 2 – to enable boot prefetching
    • 3 – to enable prefectching of everything
  6. Select “OK“.
  7. Close the Registry Editor.
Note: If you disable Superfetch and would like to enable it for certain applications, you can use special switch in the program shortcut: /prefetch:1

2. Dissable by net service

Using NET to stop a Windows Service

To stop a service, run:
net stop <Service-Name>
c:\>net stop "windows Search"

Starting a Windows Service with NET

To start an idle Windows Service, run:
net start <Service-Name>
c:\>net start "windows Search"

To stop this, and prevent it from happening during your current session (until Windows is rebooted) open the Command Prompt (the quickest way is by right-clicking the Start button and selecting Command Prompt (Admin)) and enter the following:


c:\>net stop  "windows Search"

c:\>net stop superfetch

3. Stop BITS (Background Intelligent Transfer Service)
Services.msc:
This method shows you how to Start/Stop Background Intelligent Transfer from Services.msc
Please perform the following steps:


1. Select Start and select run
2. Type services.msc
3. find Background Intelligent Transfer Service


From General tab you can Start/Stop and change the Startup type of Background Intelligent Transfer
To finish press ok button and close Services window


 Those changes affecting to reduce the usage of hard d rive therefore remain the bandwidth for data transferring . Also reduce the wear of the drive access arm and reduce drive faults.


Monday, August 22, 2016

How can find the where is short and how to fix it.
 Remove the PR102. no ac adapter light off. but I can't understand where is the problem, section may be B+ or in PU100.?


Can we fix dell 3521 mother board short cuircuit repair?

How can find the where is short and how to fix it.
 Remove the PR102. no ac adapter light off. but I can't understand where is the problem, section may be B+ or in PU100.?

Can we fix dell 3521 mother board short cuircuit repair?

How can find the where is short and how to fix it.
 Remove the PR102. no ac adapter light off. but I can't understand where is the problem, section may be B+ or in PU100.?

Can we fix dell 3521 mother board short cuircuit repair?

How can find the where is short and how to fix it.
 Remove the PR102. no ac adapter light off. but I can't understand where is the problem, section may be B+ or in PU100.?

Friday, July 22, 2016

Turn Recovery mode on for sony ericson phones

 Sony ericsson devices
xperia x10
(turn the phone on while holding the back button)


xperia x10 mini
(Press BACK button few times right after white SE
logo appears.)


xperia x10 mini pro
(boot up phone.as soon as display is on press the back key many time till you enter recovery)


xperia x8
(Turn phone on, while holding power button and pressing back button  many times)


xperia arc
( reboot
your device and press the Volume Down key
when the Sony Ericsson logo appears when the
notification LED turns blue.)


xperia arc s
(power plus vol down)


xperia play
(Turn device off. When off, press the power button,
and start tapping the back button untill device boots
into recovery)


xperia neo v
(Volume Up and Volume Down keys and then
pressing the Power Key until u boot to recovery)


sony tablet s
(Hold down power and volume up button..when SONY logo appears, release power button
but keep pressing volume up button until it loads into recovery)


xperia mini
(Now start the phone. When you see the free xperia
logo, keep pressing volume down until recovery
menu appears. )


xperia mini pro
(Press the Power button and while the device is rebooted, press the Volume
Rockers a few times to boot into the
Recovery. )


xperia active
(currently unavailable,flash rom thru fastboot)


xperia ray
(press the volume down key a few times when your
phone boots up. The sony logo brightens at one
point, press during that time)


xperia s
(Power off the phone. Power it back
on. When you see the splash screen
and the LED light turns blue, press
the Volume Up button. This allows
you to enter Recovery Mode.)


xperia p
(at boot up keep
pressing the vol up button when you
see blue led and feel small vibration from the
device)


xperia u
(currently unavailable,flash rom thru fastboot)


xperia solar
(currently unavailable,flash rom thru fastboot)

Saturday, June 11, 2016

How to identify your Tablets Processor and Board ID

How to identify your Tablets Processor and Board ID?

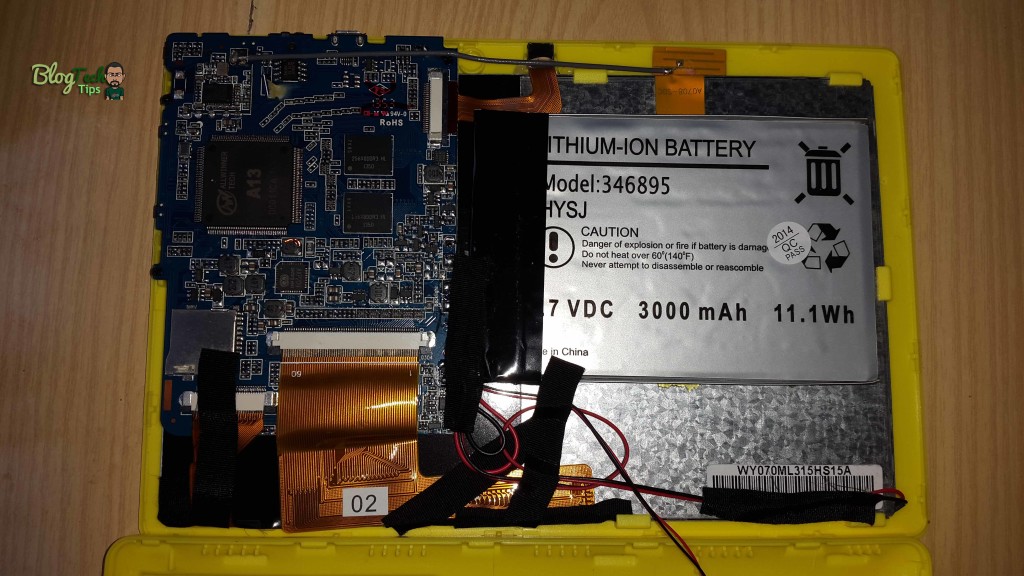
The process of identifying your tablets firmware begins with knowing your Tablets Processor and board ID, believe it or not most of these entry-level Chinese tablets are usually sporting similar boards and processors for the most part, the names of the devices might change e.g. Alldaymall, Irulu, GPad or so on but beneath they are sporting similar hardware and all you have to do is find a firmware that matches the board ID and the processor or ones thats close and you can flash your tablet and have it functioning as new. The two main type of processors that you will find on your tablet are usually the A13 and A10 processors respectively.
Chinese Tablet firmware
To find out both you will need to open your Tablet, do not panic it’s not as bad as it sounds trust me, here are the steps:
1. Tablets do not have screws that seal them in most cases so you will have to find the seems that hold both halves together.
2. Once you have found the seems, use a tool set such as the ones used in opening phones or a blunt object and force it into the seems,its best to start around the charge port in most cases, the parts will separate with little trouble as long as you are firm-do not break the clips that hold both halves together but separate the halves until the entire thing comes apart.You can refer to the video for details instructions.
Chinese Tablet firmware
3. Once both halves separate, carefully move them apart and watch out for wires such as the one that runs from the speakers.
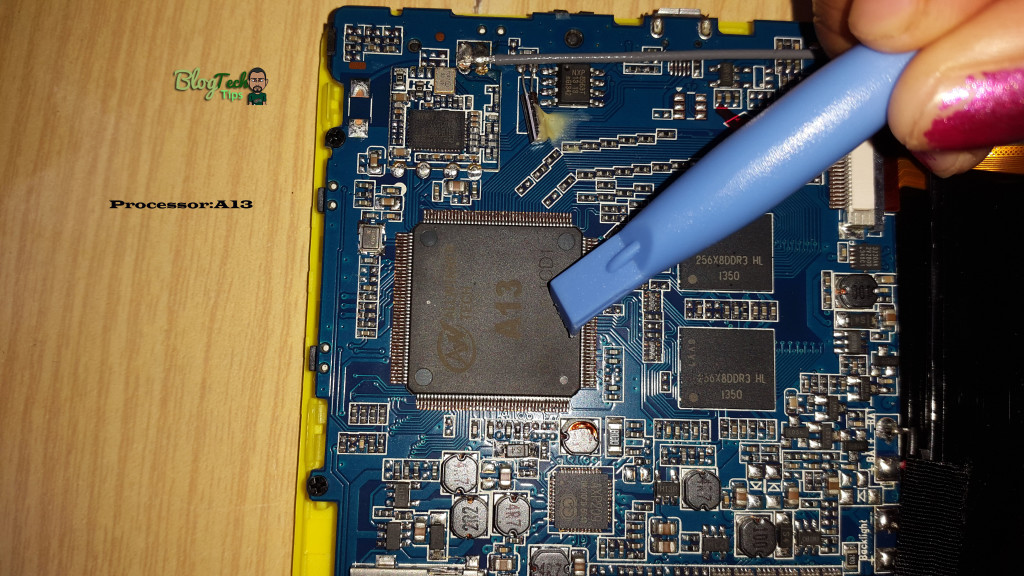
4. Look on the main part of the board and you should see a processor look out for A13 or A10 marked on them clearly:
Chinese Tablet firmware

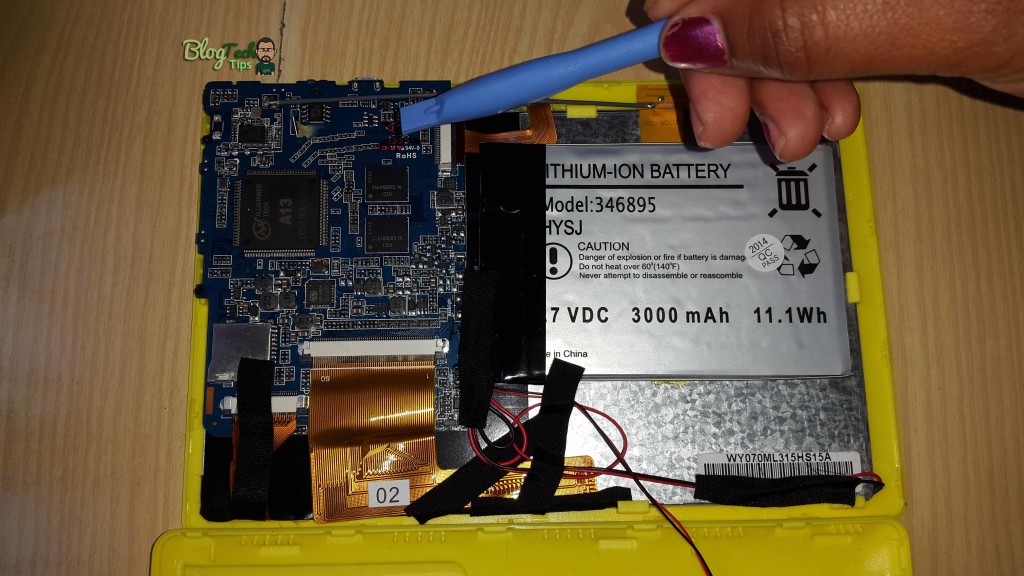
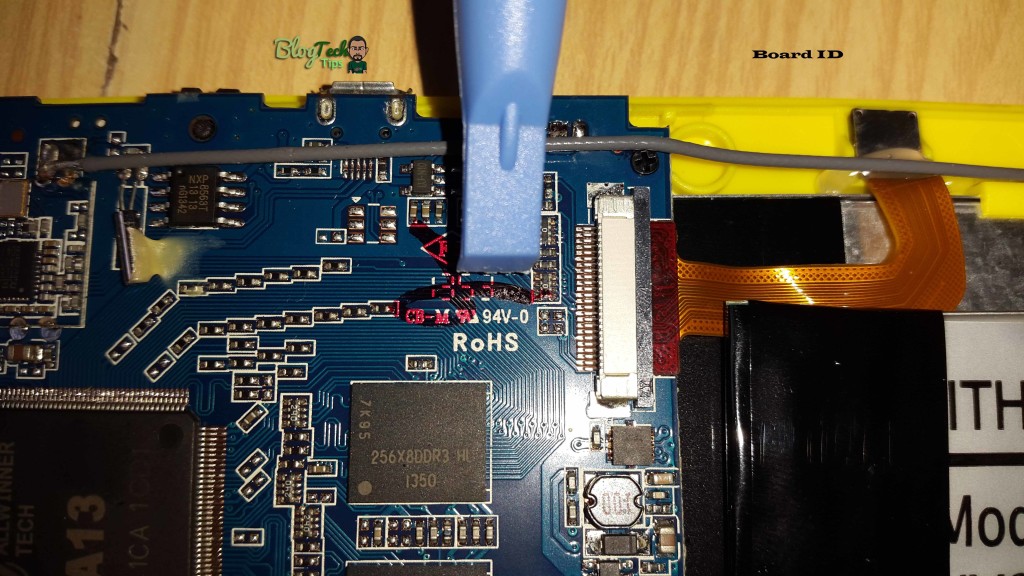
5. Last look on the board for a number its usually at the top section and it’s clearly written, this will be your Board ID, record it:
Chinese Tablet firmware Chinese Tablet firmware
That’s it you have just found your Motherboard ID and Processor, in this case the board in the tablets ID was: CB-M RU 94V-0
The processor was: A13
So now I need to search in Google for “A13 CB-M RU 94V-0 Firmware

Friday, June 3, 2016


BIOS Password


Laptops in general have much better hardware security than PCs. Some of them even come with fingerprint reader build in.


Most laptops come with a very strong BIOS password capability that locks up the hardware and makes the laptop completely unusable. This is the password that has to be entered before the operating system loads, usually on a black screen a few seconds after the laptop is started.


Of course BIOS password can be set on a PC too, but there it is stored together with the other BIOS settings – date, time, hard disk size, etc. It is very easy to reset the BIOS settings (and the password) on a PC – usually there is a jumper near the BIOS battery on the motherboard that needs to be moved from connecting pins 1+2 to pins 2+3 for a few seconds and than moved back to pins 1+2. Next time the PC is started it will alert you “… BIOS settings invalid… Defaults loaded… Press F1 to continue…” or something similar, and…. the password is gone!


However most laptops store the BIOS password in a special chip, sometimes even hidden under the CPU, that is not affected when the rest of the BIOS settings are reset. This makes the removal of a BIOS password on a laptop almost impossible. The only option in most cases is to replace the chip which is quite expensive and risky procedure and, of course, not supported by the manufacturers.

Some manufacturers (like Dell) can generate a “master password” for a particular laptop (from their service tag) if sufficient proof of ownership is provided. Others (like IBM) would advise replacing the laptop’s motherboard (very expensive). On some old laptops (4 – 5 years or older) the BIOS password can still be reset relatively easy, usually by shorting two solder points on the motherboard or by plugging a special plug in the printer port, etc.


In almost all cases on newer laptops it is either a big hassle, expensive or even impossible to reset the BIOS password, making it a very good way of protecting your laptop from unauthorized use.

However what makes your computer exactly yours are your own files, documents, emails, pictures, etc. They are all stored on the hard drive. So, even if your laptop has a BIOS password that locks it up and makes it completely unusable to anyone that doesn’t know it, your hard drive can still be removed from the laptop and connected to another computer, and your files retrieved quite easily.


How do I clear a laptop BIOS or CMOS password?

  A laptop BIOS password is more secure than a traditional desktop to help protect the data if it was stolen. If you are the original owner of the laptop, we highly recommend contacting the manufacturer of the laptop. Companies such as Dell, Lenovo, and Toshiba can reset the password if you are the original owner using the Service Tag, disk, or give you exact steps for your laptop.

If you are not the original owner of the laptop, there are some ways to bypass the password depending on the manufacture and model of the laptop.

Laptop password system disabled code5 to 8 character code on System Disabled screen


    In the CMOS setup, when prompted for a password, guess three times until you're giving the code. If, after entering the wrong password three times, the computer is displaying a 5 to 8 code, as shown in the picture, continue to the next step.
    Write down the code and visit Dogbert's BIOS Password Backdoors scripts page to download Python and the free Python scripts to clear many of these types of passwords.
    As the computer is booting, press F1, F2, or Del to enter CMOS setup.

Clear by dip switches, jumpers, jumping BIOS, or replacing BIOS

If the above suggestions do not apply to your laptop, you need to open the laptop and clear the password using dip switches or jumpers. You may also be able to jump the BIOS using a paperclip, by soldering a wire to pins on the BIOS, or replacing the BIOS chip.

The location of dip switches or jumpers on the motherboard depends on the brand and model of your laptop. Check the technical documentation for your laptop and contact the manufacturer to determine which motherboard is in your laptop. Search the Internet for that motherboard model for a technical diagram of where components are located, including the dip switches or jumpers for resetting the BIOS.

Which step you take depends on the manufacturer and model of your laptop computer. For most end users we highly recommend having the laptop serviced by a qualified technician who can properly disassemble a laptop.

Contact laptop manufacturer

If the above steps do not help remove the CMOS password for your laptop, we suggest contacting the laptop manufacturer for steps on how to clear the password. Many manufacturers have strict policies in place to help protect their customers' laptops and only they have the information on how to clear CMOS passwords.

 To try unlock code with 

https://bios-pw.org/

 links: http://www.computerhope.com/issues/ch001302.htm

http://www.laptoptips.ca/security/bios-password/

Monday, June 1, 2015

Fix windows Service error : ex- Printer spooler Stopping

Fix windows Service error

Previous Windows Operating Systems will return following error message “The print spooler service is not running” when you try to print or open printer properties, which means something wrong with the print spooler service on the computer.

Print Spooler Stopping Automatically warning message

Steps to Fix Print Spooler Keeps Stopping Automatically Issue on Windows 7, Windows 8 and 8.1

Simple step you can do straightaway is, starting the print spooler service from Services ( or in command prompt as on step 2) manually.
1) ‘Services’ can be found under Computer Management, but to access it easily on Windows 8 or 8.1, type ‘Services.msc’ on search.
Services.msc
Open services and locate Print Spooler, I’m sure it will be in the stopped state, so you can start it now.
print spooler service start on Windows 8.1

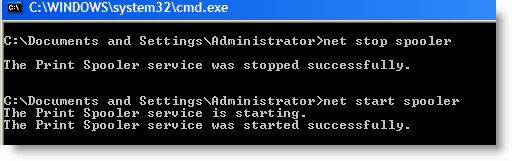
2) If you like commands, then use this method to start/stop print spooler in command prompt. Make sure to open command prompt with administrator privilege ( Run as Administrator).

To start print spooler, type;

Net start spooler
netstop
To stop print spooler, type;
Net stop spooler
If print spooler keeps stopping in Windows 8,8.1 or 7 even after starting the print spooler as mentioned earlier, then follow below steps.
3) You can try below steps if you think print spooler is not responding to your print commands and print is not happening when printer is fine physically (No paper jam or any error indications on printer hardware).  These methods will help to clear the pending print jobs (print queue) and hanging spooler service.
Clear the print spooler files where the Operating Systems store printing jobs temporarily, deleting these file will allow the print spooler to start freshly and run smoothly next time.
Go to C -> Windows -> System32 -> Spool -> Printers and delete all files inside this folder. This is the location OS keeps the printing jobs before sending to printers. Once you delete these files, print queue will be cleared. The same location is applicable for latest Windows 8 and 8.1 too.
spool
Most of the times these steps will solve the print spooler keeps stopping automatically issue.

Additional Steps to Fix

If the problem still exist even after trying earlier steps (if the physical printer connectivity is fine and physically there are no issues on the printer, cartridges and out of papers) on your Windows 8, 8.1 or Windows 7 computers, try these additional steps.

1) Make sure you have already done mentioned earlier methods..
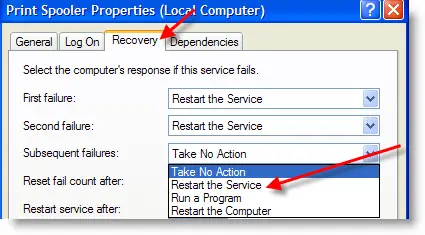
2) Go to services ( as on step 1) under Computer Management, Double click Print Spooler service and go to Recovery tab. Here we can set what that service should do when it fails.
Select ‘Restart the Service’ in Subsequent Failures field. So, it will try restarting print spooler service whenever it fails.
recoverytab
This will not be the permanent solution if the spooler service keeps stopping and automatically restarting again and again. Better find out the real problem and fix it.

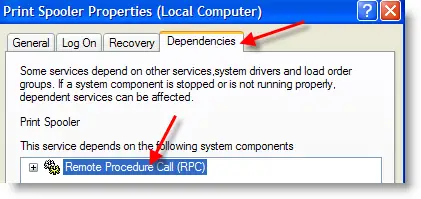
3) Go to ‘Dependencies’ tab and make sure all depending services are started. Luckily, only one dependency service for print spooler service which is Remote Procedure Call (RPC) service.
So, check the RPC service in services and make sure it’s already started, these methods are applicable for Windows 8,8.1 and 7 too.
depend
4) Last step which worked for me recently, wrong printer driver installation. Yes, if you installed completely unrelated wrong driver to any of the network or local printer, you may face this print spooler stopping frequently problem. By default Windows OS tries to communicate with all printers very often even if you don’t print on theme. When printer and OS talk wrongly because of wrong driver installation, Windows stops the print spooler service automatically.
Try these two methods,
a) Delete all unwanted printers from your computer.
b) Make sure all printers are installed with proper drivers ( or at least with similar model)
Once I changed to correct print driver, it solve my problem very easily.
Try the above methods, I’m sure one of them will solve print spooler stopping automatically problem.

Tuesday, May 5, 2015

SIM card Cords Mobitel Aialog Airtel in Sri Lanka

Dialog

* සිම් එක කාගෙද - #132#

* තමන්ගෙ නමට තියන වෙනත් සිම් - #132#1#1#
*ගිණුමේ ශේෂය ඉහල දැමීමට - *123*පින් අංකය#
*ගිණුමේ ශේෂය - *#456#
*අමතර අවශ්‍යතා - #107#
*සම්බන්දතාවය ගැන විස්තර #678#
*ණයක් ගන්න - #356#
*කරදරකාර එස් එම් එස් බ්ලොක් කරන්න - BLOCK<space>Block කරන්න ඕනි අංකය තමාගෙම අංකෙට මැසේජ් එක යවන්න

*එස් එම් එස් ඩයිවරට් කරන්න - DVI<space>Divert කරන්න කරන්න ඕනි අංකය තමාගෙම අංකෙට මැසේජ් කරන්න
*Star Points බලාගන්න - #141#
*Call Waiting Activate කරන්න - *#43#
*Missed call Alert Active කරගන්න - **62*0777012012#

*Dialog Mobile BROADBAND ( එස් එම් එස් වලින ඇක්ටිව් කරගන්න )

KBB<SPACE>පැකේජය (20,50,100,200,400) තොරා 678 ට සෙන්ඩ් කරන්න

පෙරගෙවුම් වයිෆයි

පැය 2 - WIFI<space>50

පැය 4 -WIFI<space>100

පැය 12 - WIFI<space>200

පැය 20 WIFI<space>400

පැය 50 - WIFI<space>1000 ලෙස ටයිප් කර 678 ට සෙන්ඩ් කරන්න

ඩයලොග් භාවිතාකල දත්ත ප්‍රමාණය දැනගැනීමට MBB ලෙස ටයිප් කර 678 ට සෙන්ඩ් කරන්න

Mobitel

* සිම් එක ගැන විස්තර - #132#
* ශේෂය ඉහල දැමීමට - *102*පින නම්බරය#
* ගිණුමේ ශේෂය බලාගැනීමට - *100#
* ණයක් ගැනීමට - #247#
* ණයක් දෙන්න - *448*අවශ්‍ය අංකය*ණයමුදල#
* GPRS / MMS සෙටින් ලබාගැනීමට -#222#
* M tune ඉවත් කරගැනීමට Unsub ලෙස 777ට එවන්න

* Mobitel Mobile Broadband SMS මගින් ඇක්ටිව් කරගන්න.

දිනක 100 Internet පහසුකම ලබාගැනීමට නම් D25 ලෙස 7678ට SMS කරන්න.( D25, D75, D299 ලෙස යැවීමෙන් 200MB හා 1GB ලෙස ඇක්ටිව් කරගත හැක )

Hutch

* සිම් එක ගැන විස්තර #132#
* ගිණුමේ ශේෂය *344#
* Missed Call Alert ඇක්ටිව් කරගන්න - *62*1000#
* Credit නැතිවෙලාවට කොල් එකක් ගන්න කියන්න - යාලුවගෙ අංකය ටයිප් කර 456ට යවන්න
* Sms Free Hutch to Hutch පැකේජය *222#

Etisalat

* සිම් එකේ විස්තර දැනගැනීමට #132#
*ගිණුමේ ශේෂය ඉහල දැමීමට *336*පින් නම්බර් ඩයල් කරන්න නැතහොත් #133*pin no# අමතන්න
*ගිණුමේ ශේෂය දැන ගැනීමට #134#
*Missed Call Alert Active කර ගැනීමට *346 Dial කරන්න
*Call A tune සදහා *359 අමතන්න
*සම්බන්දතාවය ගැන දැන ගැනීමට *262 Dial කරන්න
*mobile broadband
දිනක 50Mb ක අන්තර්ජාල පහසුකම සදහා D29
දින 7 ක 150Mb ක අන්තර්ජාල පහසුකම සදහා W49
මාසෙක 1GB ක අන්තර්ජාල පහසුකම සදහා M299 ලෙස ටයිප් කර 2211ට Sms කරන්න
* Etisalat Service - #111#

Air Tel

* සිම් එක ගැන විස්තර දැනගැනීමට #132# හො *140*6570#

* ගිණුමේ ශේෂය දැන ගැනීමට *555#
* ගිණුමේ ශේෂය ඉහල දැමීමට *567#පින් නම්බර්#
* GPRS/MMS settings ලබා ගැනීමට ALL ලෙස ටයිප් කර 2222ය සෙන්ඩ් කරන්න

පසුගෙවුම් සබදතා සදහා

* Outstanding balance - *555*1#
* Unbilled balance - *555*2#
* Bill Summery - *555*3#
* Payment Status - *555*4#

Wednesday, April 29, 2015

elecom htu332 gbk write protect error Solved

elecom htu332gbk 32GB Flash Drive write protect error Solved

Use these Simple Methods

http://www.makeuseof.com/tag/how-to-fix-write-protection-errors-on-a-usb-stick/

If not Solved Pls download Restore-v3.13.0.0.exe 

I Use this tools to Restore 

elecom htu332gbk 32GB

Phison PS2251-02

Toshiba 983AA892 13FE 5100 Phison

32

 Download

http://anton34rus.spaces.ru/files/?r=main/view&Li=5&Lii=49713319&Link_id=1551637&Lt=6&Read=52489173&Sn=26&from=shared_zone&link_id=1551637&sid=3918809442722391

-

Run Exe

select drive to Format

Select Restore Button

After Finish Repluf usb and copy any File

Before format backup all files to Hard drive

Tuesday, February 10, 2015

All Wintouch Firmwares

All wintouch Frimeware


http://forum.gsmhosting.com/vbb/f606/firmware-collection-all-wintouch-firmwares-flasher-tools-download-here-1652650/


if you need firm ware for win touch models and soft winer A106 (is matched with q91)


Sunday, February 8, 2015

Why is my wireless signal strength so low?

If a wireless network has a low signal strength, the transfer of information across the network could be slow or you might not be able to access certain parts of the network. Here are solutions to some common problems with low wireless signal strength:

  • Your computer is too far from the wireless router or access point.

    Move your computer closer to the router or access point. If your computer is portable, try moving it around to determine the range of the wireless signal and the best place to use the computer.

    If you can't get closer to the router or access point, consider buying and installing an external antenna for your wireless network adapter. Many wireless network adapters are set up so that you can attach an external antenna to them, which provides better reception than the built-in antenna. Check the information that came with your wireless network adapter to see if you can install an additional antenna.

  • The wireless router or access point is turned off or isn't working properly.

    There are two things to try:

    • Make sure the router or access point is turned on and that the wireless signal light is illuminated.

    • Reset the router or access point by turning it off, waiting at least 10 seconds, and then turning it back on.

    If you don't own the access point or don't manage the network, contact the network administrator.

  • There is interference from other devices.

    If you have 802.11b or 802.11g network hardware, it uses the 2.4 gigahertz (GHz) frequency. Other devices that use this frequency include microwave ovens and cordless phones. If you have 802.11a network hardware, it uses the 5 GHz frequency. Some cordless phones also use this frequency. These devices can cause interference between your computer and the network.

    There are two things you can try in this situation:

    • If any devices like these are near your computer, turn them off temporarily or move them farther away.

    • Change the router or access point settings to use a different wireless channel, or set the channel to be selected automatically if it's set to a fixed channel number. Sometimes one wireless channel is clearer than others. In the United States and Canada, you can use channels 1, 6, and 11. Check the information that came with your access point or router for instructions about setting the wireless signal channel.

  • The network you're looking for is set to not broadcast its network name (SSID).

    Wireless routers and access points can be set up so that they don't broadcast the network name. In this case, you can't detect that the network is in range (in order to connect to it) unless you've previously connected to the network or you manually connect to the network using the service set identifier (SSID). To connect to a network that's not broadcasting, follow these steps:

    1. Open Connect to a Network by clicking the network icon (Picture of the wireless network icon or Picture of the wired network icon) in the notification area.

    2. Click Unnamed Network, and then type the network information.

      The network will be added to your list of networks and will be available to connect to in the future when your computer is in range of the network.

      8 Ways to Fix a Weak WiFi Signal

      In just a decade, WiFi signal has become almost as essential as food, water, and shelter. A weak signal can be a modern day nightmare. Poor loading times and lost connections can test your patience while browsing the internet. This guide will help you understand why your WiFi signal can become weak and how to improve it cheaply.


      Get a Modern Router

      I just moved and recently got cable. The Internet installer laughed, pointed, and mocked my wireless B router. I had no idea I was using caveman technology. Apparently WiFi speeds are much slower on wireless A, B, and G routers. Wireless N is all the rage when you want the fastest speeds possible. You will need both an N router and an N card in your computer for maximum speed.


      Check for Router Updates

      While not as annoyingly frequent as app updates, router manufactures sometimes issue stability resolutions via driver updates. Go to the manufactures website to download all new maintenance updates and changes.


      Don’t Hide Your Router

      Routers can be disgusting looking things and your first instinct is to hide it behind your television or in a box. Resist that urge as a wide open router, clear of obstructions and with antennas pointed upwards, will perform better. Make sure the router is relatively close to where you’ll be using the WiFi.


      Change WiFi Channel

      Wireless routers broadcast on numerous different channels, similar to radio stations. It can cause buildup and static if a lot of people are on the same channel. Newest routers feature automatic channel selection. If you have an older model, test and try another channel to see if you experience less interference.

      Use the free Wifi Analyzer Android app to pick the best channel for your router. The app works great by scanning immediate channels and helping you find a less crowded channel. Move the router around the house to maybe find an even better channel.

      For iPhone users, check out the $4 WiFi Explorer app to help find the right channel. Quickly identify channel conflicts, signal overlapping or configuration problems that may be affecting the connectivity and performance of your home or office wireless network. Get an insight into network details like name (SSID), MAC address (BSSID), device manufacturer, signal strength (RSSI), noise, channel, band, security configuration, supported data rates and much more.


      Use Two Routers

      Even if you have a fast connection, too many electronics can often overwhelm your WiFi. Using two routers can be very beneficial. Take advantage of the free (or cheap) router your cable provider gave you and use it as an access point. This is useful for a home entertainment system or a game console that can be constantly plugged in via Ethernet cables, leaving the WiFi for your smart phones and laptops.


      Kick Your Neighbors Offline

      Your freeloading neighbors will now have to search elsewhere. WPA encryption is much harder to hack than WEP, so go with WPA for your password. You can check if someone other than you is using your WiFi. Make sure your network, gaming console, and everything else using the Internet is turned off. Look to see if the wireless light is still blinking. If so, you may have a leech (or worse, a potential hacker) to deal with.

      Use a program like MoocherHunter, which is used by police in some countries, to find real-time users of your wireless network.


      Buy a Range Extender

      If your WiFi is having trouble reaching all ends of your house or large office, consider buying a range extender. A basic $50 extender should do the trick. This probably won’t make your WiFi any faster, but at least you’ll have Internet access in the basement and attic. You can also create a DIY extender, but I am certainly no expert on that.


      Do a Speed Test

      If you have followed most of these steps, and still don’t see an improvement, check out what kind of speeds you are getting at Speedtest.net. If the speed is significantly lower than what you are paying for, discuss this matter with your cable provider. Sometimes cable providers throttle down your Internet performance so they can hit you with a bandwidth usage fee. Research your provider and consider switching to a company who doesn’t limit your Internet speeds.

      There’s plenty of more tricks and tips for faster WiFi speeds, like using a beer can. Do you have any WiFi hacks to share with the class?


How to resolve poor or no signal from a wireless router

Resolving poor wireless signal

There are a few factors why your wireless device is getting low or poor signal from the router.  This article will guide you on how to resolve these issues.

Low or poor signal is mainly caused by six (6) major factors:

      •    Distance problems
      •    Physical obstructions
      •    Wireless interferences
      •    Transmit rate on the wireless router
      •    Outdated firmware on the router
      •    Power outage

Distance problems

Wireless devices have limitations when it comes to their signal range.  For devices running on 2.4 GHz, the range can go up to 100-150 feet (30-46 meters).  If your wireless network devices are too far from each other, consider relocating the devices.  Remember that distance is directly proportional to signal strength.  The farther you are from the access point, the weaker the signal.

To check if you’re getting a stable connection, perform a continuous ping.  If you’re getting replies most of the time, this means the connection is stable.  If time outs are occurring frequently, the connection is not that stable.  For instructions on how to perform a continuous ping on your computer, see the article below:

Pinging the Linksys router

To get the best connection, you may need to find ways to move your computer closer to the center of the router’s range.  When choosing an area where the router will be placed, ensure that it is well ventilated.

Physical obstructions

Wireless networks are also susceptible to obstructions that may lead to low signal.  Oftentimes, the signal gets reflected, refracted, or absorbed by the obstruction.

Common obstructions are:

      •    Cabinets or drawers
      •    Mirrors, Glasses
      •    Metal Objects
      •    Thick walls and ceilings
      •    Aquariums

If you have any of these objects between your wireless adapter and access point, consider relocating your access point somewhere high to get around the obstruction.

Routers have a default broadcast range that is dependent on their wireless networking standard (Wireless -B, -A, -G, -N, -AC draft) and the wireless signals broadcasted by the router may not be able to completely penetrate thick walls and other common obstructions.

Also, you may use a Linksys range extender or Powerline to boost the signal of your router if you have a big area and there are a lot of obstructions between your router and the wireless device.  For more information about how to expand your network using Powerline adapters, click here.

Wireless interferences

Common sources of interference are:

      •    Neighboring wireless networks
      •    Microwave ovens
      •    2.4 GHz cordless telephones
      •    Bluetooth® devices
      •    Wireless baby monitors

To solve the problem, change the channel and SSID on your access point.  Preferred channels to use are 1, 6, 9 and 11 since they’re considered as non-overlapping channels.

The 802.11b/a/g/n standards use the 2.4 Gigahertz (GHz) band.  With this frequency, 802.11b/a/g/n equipment may encounter interference from microwave ovens, cordless telephones, Bluetooth® devices, and other appliances using the same band.  To learn how to change your wireless router’s channel, see the article below:

Changing the wireless channel on a Linksys router

You can also select the 40 MHz channel width on your 2.4 GHz network to improve the performance of your Wireless-N network.  However, this is only advisable if you are in a location less crowded with wireless networks.  It is also important to note that in order for your wireless devices to connect to the network, they need to have a Wireless-N network adapter that is compatible with the 40 MHz wireless channel.  The latest versions of Linksys Wireless-N adapters can connect to a 2.4 GHz network with 40 MHz radio band.

QUICK TIP:  The Linksys Smart Wi-Fi Routers have the 40 and 80 MHz Channel widths in the 5.0 GHz network.

If you are not sure about the settings, it is best to leave it at its default settings.  The channel width is set to Auto by default.  This automatically defines the best wireless channel for your wireless network.

Transmit rate on the wireless router

Changing the Transmit Rate on the router allows the device to work at a specific speed for wireless transmissions.  The default Transmit Rate is Auto with a range of 1 to 54 Mbps.

The rate of data transmission should be set depending on the speed of your wireless network.  You can select from a range of transmission speeds or keep the default setting, Auto.  This will allow the router to automatically use the fastest possible data rate and enable the Auto-Fallback feature, which will negotiate the best possible connection speed between the router and a wireless client.

NOTE:  If the transmit rate on the router or the adapter is not set to Auto, the Auto-Fallback feature will be disabled.  If the Auto-Fallback is disabled, you will not be able to experience the maximum range of the wireless router as it will not be able to adapt to the environment’s condition.

Linksys does NOT recommend changing the transmit rate of the router other than the default value since it will shorten the range of the wireless network as shown in the sample diagram below.

If you can't get connected into your router after changing the transmit rate to AUTO, try to change the transmit rate manually by using the router’s web-based setup page.  You can do this by accessing the router’s web-based setup page, then click on Wireless > Advanced Wireless Settings.  You can set your preferred rate on the Transmission Rate drop-down.

Outdated firmware on the router

Outdated firmware on the router can sometimes cause connection issues in your network.  To fix this, you need to upgrade the firmware of your router.  To properly do this, click here.  For a video on how to upgrade the router’s firmware, click here.

Power outage

One factor that may also trigger the poor performance or loss of wireless signals coming from the router would be power/electricity interruptions.  If you are not able to acquire any wireless signal after a power outage, you may powercycle the router by unplugging and re-plugging the power cord from the power outlet for 10 seconds.

However, if the powercycle still does not resolve the problem, you may need to reconfigure the wireless settings of your router.  Refer to the links below for more information:

Monday, January 19, 2015

Useful Tips and Tricks in Windows 7

Useful Tips and Tricks in Windows 7

In this tutorial i will show you useful tips and trick in Windows 7 to keep it in top performance :

-Disable unnecessarily program that run in windows startup:
 Sometimes when you install a new softwares, they automatically run when you start windows and to prevent that simply go in software setting and uncheck this option. or go in statrup → run → type msconfig → a new windows will appear → go in startup option and uncheck all unnecessarily programs ( for me i check just my antivirus) and restart your computer.

-Back up your registry:
most of time we forget to save a copy of our registry so when something not good happens we can back up it.  in the past i was downloaded a crack from Best Blackhat Forum and that crack was infected and it hurt my registry. but because i was back up my registry before, all was fine.
this is how to save a copy from your registry :
go in startup → run → type regedit→ in file tab choose export, name it as you which and click save :


if you want to backup it just do all above steps but this time click import then choose the registry backup file.

-Repair problems of system:
 To do that you need a litte tool called FixWin  you can download it from here : FixWin 1.2
this is a screenshot about this tool :


-Prevent others to access your registry and damage it:
To prevent hackers to access your registry go in startup→run→type gpedit.msc → user configuration→administrative tools → system → double click : prevent access to registry editing tools and choose enbaled

if you want to edit your registry again just do the steps above and choose "not configured"

-Update your drivers without softwares:
 to update your drivers without  softwares go in startup→run and type : devmgmt.msc → right lick to the driver you want to update and choose properties → details → and copy the name of your driver :

 
now visit that site ( you must internet explorer)  : Catalogue Microsoft Update

install the extension then go in search bar and paste the name of your driver you wll get all version of your driver :


choose the version you want to download and add it then click download, select the location of the downloaded driver and click next, wait until download finish , 

 -Enable GodMode feature:
by enabling this feature you can control up to 274 windows feature easily :


to enable it just create new folder and name it : GodMode.{ED7BA470-8E54-465E-825C-99712043E01C}

I hope you like this tips and if you have any questions just leave a comment.