Saturday, November 9, 2013

Repairing your usb flash drive

Beginning...

Repairing your usb flash drive, we found the magic answer for this particular low level formatting tool. How USB Flash is created. The procedure differs for each low level formatting tool and it is NOT advised people experiment, unless willing and prepared to lose the usb flash drive. Low level formatting is done once, at the Fab. Repeating this procedure affects the life span of the memory chip (wear leveling). The more low level formatting carried out on a nand memory chip, the shorter life span it will have before failure. Exercise care.

Step 1

In very very First You need to find the VID and PID for Your Flash Drive

 To Do this You can use 2 Tools ( we Recommend)

1. Chip Genius                    Ex: ChipGenius_v4_00_0027_pre2.exe  ((pls download from internet))

2. Chip Easy                       Ex: ChipEasy_v1.4.5.zip    (pls download from internet)

 Use both tools to Identify real chip information.


-------------------------------------------

Description: [N:]USB Mass Storage Device(Static USB Data)
Device Type:        Mass Storage Device

Protocal Version: USB 2.00
Current Speed: Full Speed
Max Current: 100mA

USB Device ID: VID = 0591 PID = 1624
Serial Number: F8A24CF5

Device Name: Static USB Data Ready
Device Revision: 0104

Product Model: Static USB Data
Product Revision: 8.07

Controller Vendor: Alcor Micro
Controller Part-Number: SC908AN/AU6989AN - F/W D811
Flash ID code:      98DE9892 - Toshiba - 2CE/Single Channel [TLC] -> Total Capacity = 16GB

Tools on web:       http://dl.mydigit.net/special/up/alcor.html

-------------------------------------------


As an Exapmle you can Identify the Controller Vendor: Alcor Micro 

Chip info as SC908AN/AU6989AN - F/W D811 


Also by Chip easy the same


If not found the chip or flah detection .Pls find any damage in the USB port (Dissemble and resold)


Seep 2


Pls find the proper Tool for Controller Vendor: Alcor Micro Chip Controller Part-Number: SC908AN/AU6989AN


You can find in the internet Find and Download

  Web Sites: 

http://monchegorskham.pp.ua/vosstanovlenie-flash-nakopitelya/#

http://www.usbdev.ru/news/

http://flashboot.ru/iflash/page5/

http://www.upan.cc/tools/

Type VID and PID search


Ex: FCMPTool(050204.MD)


Step 3 :

Remove all flash drives

open Extracted tool (example: AlcorMP.exe)


Step 4:

Press Driver Button

Type VID and PID (Find VID and PID by Chip genious Information or Chip easy information.

Ex: USB Device ID: VID = 0591 PID = 1624

Press Load and exit Button.


Step 5:

Inset the Flash Drive


Error Detecting or not detecting pls find another Tool


If detected properly press start button


If any error find another tool

If your tool is properly match the result will be a good one. Flash drive colour will be Green .

Exit Tool

And pls check the Drive is ok.


(You may have to change setup information to proper formatting.)

Ex: Can't complete low level format /Change setup to high level format)

 To more information Use tool help.


                 Good luck


Saturday, July 6, 2013

CARING FOR YOUR G TABLET

CARING FOR YOUR G TABLET

Caring for the LCD Screen

The LCD Screen is the most delicate component of the gTablet and comprised of thin glass.  Please treat with care.

 ·         DO NOT apply abrupt force as LCD screen may break.

·         Place the gTablet in carrying case to protect it from dirt, water, shock and scratches before traveling.

·         DO NOT drop or place heavy objects on the LCD Screen.

·         DO NOT scratch the LCD Screen with fingernails or hard objects.

·         Use a soft and lint-free cloth to wipe your gTablet.  Wipe gently in order to avoid damaging the LCD Screen.

·         DO NOT use your hand to wipe the LCD Screen directly.

·         Turn off the gTablet if it will not be used for a long time.

·         DO NOT clean the LCD Screen with chemical cleaners, acidic cleaner, or spray cleaners.

·         Ensure that the LCD screen does NOT come into contact with hard objects (e.g.: buttons, watchband, pen).

·         DO NOT spill liquid on or into the gTablet as it can damage the components of the gTablet.

·         To properly clean your LCD screen, use a product specifically designed for LCD TVs and computers.


Caring for the Battery

The gTablet battery is a Lithium Ion rechargeable battery.  Battery life can be increased while using the gTablet by managing your LCD screen brightness and your wireless (WiFi) connection.  To maximize your battery life, review the following:


·         Check your LCD screen brightness setting by tapping on the ¡°Settings¡± icon from the applications menu.  Then tap on ¡°Display¡± and under ¡°Brightness¡± move the slide bar towards the left to decrease brightness.  This will save battery power allowing your gTablet to operate longer before needing to charge.


·         Turn your wireless (WiFi) connection to ¡°Off¡± if you are not using wireless.  Do this by tapping on the ¡°Settings¡± icon in the Applications Task Bar.  Then tap on ¡°Wireless & networks¡± and turn the wireless to ¡°Off¡±.  This will significantly contribute to your battery life.  Remember to turn this setting back on.  You may also access wireless settings by tapping on the ¡°wireless¡± icon in the right hand corner of the top status bar and turn the wireless to ¡°Off¡±.


14          SAFETY PRECAUTIONS

1.     DO NOT press or touch the LCD Screen or place items on the screen which will scratch.

2.     DO NOT expose the gTablet to dirty, dusty, or moist environments.

3.     DO NOT expose the gTablet to strong magnetic or electrical fields.

4.     DO NOT leave the gTablet in the sun as it can damage the LCD Screen, especially in the car.

5.     SAFE TEMPERATURE: The gTablet should only be used in environments with ambient temperatures between 41¡F (5¡C) and 95¡F (35¡C).

6.     DO NOT expose the gTablet to liquids, rain, or moisture.

7.     Caution: There is a risk of explosion if battery is replaced with an incorrect battery type.

8.     DISPOSING: check local regulations for the proper disposal of electronic products. Please recycle the Battery Pack, and check with your Local Authority or retailer for recycling advice.

9.     The gTablet and the Adapter can create heat while operating or charging. DO NOT leave the gTablet on your lap or any part of the body in order to prevent discomfort or injury from heat exposure.

10.  INPUT RATING: Refer to the rating label on the gTablet and be sure that the Power Adapter complies with the rating. Only use attachments or accessories specified by the manufacturer.

11.  Check the connections between the main unit and attachments before turning on the gTablet.

12.  DO NOT insert anything into the gTablet that may result in short circuit or damage the circuit.

13.  Power off the gTablet, if you want insert / attach or remove any external devices that do not support hot-plug.

14.  Before cleaning, disconnect the gTablet from the electrical outlet and remove any installed batteries.

15.  Keep gTablet away from children.

16.  DO NOT disassemble the gTablet.  Only a certified service technician should perform repairs on your gTablet. Otherwise, problem may result and the manufacturer will not be responsible for any damage.

17.  DO NOT place the gTablet on soft surfaces (e.g.: bed, sofa, your lap), otherwise it maybe become too hot and halt the system.

15          FCC COMPLIANCE

This device complies with part 15 of the FCC Rules. Operation is subject to the following two conditions:


·          This device may not cause harmful interference.

·          This device must accept any interference received, including interference that may cause undesired operation.


This equipment has been tested and found to comply with limits for Class B digital device, pursuant to part 15 of the FCC Rules. These limits are designed to provide reasonable protection against harmful interference in a residential installation. This equipment generates, and can radiate radio frequency energy.  If not installed and used in accordance with the instructions, it may cause harmful interference to radio or television reception, which can be determined by turning the equipment off and on. The user is encouraged to try to correct the interference by one or more of the following measures:


·          Reorient or relocate the receiving antenna on the affected receiver.

·          Increase the separation between this device and the receiver. Connect this device into an outlet on a circuit different from that to which the receiver is connected.

·          Consult the dealer or an experienced technician for help.


CAUTION: This equipment has been tested and found to comply with the limits for a Class B digital device, pursuant to Part 15 of the FCC Rules. All peripherals must be shielded and grounded. Operation with non-certified peripherals or non-shielded cables may result in interference to radio or reception.


CAUTION: Any changes or modifications not expressly approved by the manufacturer of this device could void the user¡¯s authority to operate the device.


16          TROUBLESHOOTING
Q:    How do I turn off the gTablet when it freezes and cannot warm boot?

A:   Press the POWER button and hold 4 or 6 seconds to turn off the gTablet.  Then restart.


Q:   Applications that I previously downloaded have disappeared after an OTA update, what happened?

A:   Some applications might need to be reinstalled after an OTA update has been performed. 


Q:    What do I do if I can not turn on the gTablet?

A:   

1.     If the power is low, connect to the electric outlets.

2.     Make sure the indicator light indicator of the adapter is on.

3.     Remove the micro-SD card and any other external device.


Q:    What do I do if water gets into the gTablet?

A:  

1.     DO NOT turn on the gTablet.

2.     Disconnect the power cable to turn off the gTablet (do not use the power button). Detach the battery pack.  Disconnect all external devices.

3.     DO NOT place the gTablet into the dirty carrying case.

4.     DO NOT use a hair dryer on the gTablet.

5.     Then, take to a service center for advice.


Q:    How do I recover the factory status?

A: Tap on ¡°Settings¡±---¡°Security¡±---¡°Factory data reset¡± to recover the system to the default status in Main Menu.  Note that all of your personal data will be lost (emails, contacts, etc.).  Data saved on the internal storage like photos and music files will not be lost.  Be sure to back up files that you wish to save. 


Q:    How do I prolong increase battery life?

A:   

1.     Adjust the brightness of the LCD Screen to proper level.

2.     Turn down the volume.

3.     Turn off wireless if not in use.


Q:    What do I do if the camera image is not clear?

A:   Check that the lens is clean.  If not, clean with the soft cloth.


For Customer Service, please visit www.viewsonic.com/gtablet.

Thursday, July 4, 2013

How to Factory Reset Your Android Tablet

How to Factory Reset Your Android Phone or Tablet When It Won’t Boot......

android-recovery-mode

Safe mode can help you troubleshoot your Android, but sometimes you’ll need to wipe everything and restore your device to its factory state. You can even perform a factory reset when your Android phone or tablet won’t boot normally.

Ensure you have any important data backed up before doing a reset. This includes your Google Authenticator credentials, which will be lost during the reset. Disable two-factor authentication on your accounts first or you’ll experience some trouble afterwards.

If You Can’t Boot

If safe mode doesn’t help fix your device, you can perform a hard reset by booting into a special recovery mode. First, ensure your device is fully shut down.

Press and hold the correct keys to boot the device into recovery mode. This will vary from device to device. Here are some examples:

  • Nexus 7: Volume Up + Volume Down + Power

  • Samsung Galaxy S3: Volume Up + Home + Power

  • Motorola Droid X: Home + Power

  • Devices With Camera Buttons: Volume Up + Camera

Similar devices will likely use similar key combinations. For example, the Nexus 4 also uses Volume Up + Volume Down + Power.

If your device isn’t on this list and none of the above methods work, do a Google search for the name of your device and “recovery mode” – or look in the device’s manual or support pages.

Release the buttons when the device powered on. You’ll see an image of an Android lying on its back with its chest open and its internals revealed.


Press the Volume Up and Volume Down keys to scroll through the options until you see Recovery mode on the screen.


Press the Power button to restart into recovery mode. You’ll soon see an Android with a red triangle.

Hold down the Power button and tap Volume Up. You’ll see the Android system recovery menu appear at the top of your screen.


Select wipe data / factory reset with the volume keys and tap the Power button to activate it.

Select Yes – erase all user data with the volume buttons and tap Power. Your device will be reset to its factory state and all your data will be erased.


If your device freezes at any point, hold down the Power button until it restarts.

If You Can Boot

You can reset your Android phone or tablet normally from its Settings screen. Tap the Backup & reset option on the latest versions of Android or tap Privacy if you’re using Android 2.3.


Tap the Factory data reset option and to through the reset of the steps to confirm the factory reset.


If the factory reset process doesn’t fix your problems – or doesn’t work at all – it’s likely that there’s a problem with your device’s hardware. If it’s still under warranty, you should have it fixed or replaced.

(There’s one exception to this: If you’ve been flashing custom ROMs and messing with your device’s low-level software, it’s possible that you could have overwritten the stock recovery software. In this case, it’s possible that you have a software problem and not a hardware problem.)

Track and trace

Using Track & Trace

What is CourierPost Track & Trace?

Track & Trace means you may track the progress of your parcel with our online parcel tracker using the unique barcode. For further description please refer below

What is and where can I find a tracking number/ticket/tracking code?

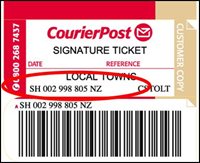
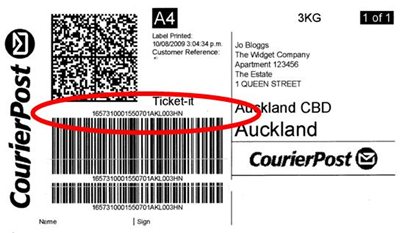
Each item sent with CourierPost has a unique ticket attached identifying that item and each ticket includes a unique barcode. Examples are shown here in the pictures:
HINT: You don't need to enter spaces in-between the numbers/letters.


What numbers or letters do I enter into Track & Trace?

Please use the tracking numbers letters as shown in the examples above (you don't need to include the spaces in-between numbers), or provided to you by the item’s sender.
Each item sent with CourierPost has a unique ticket attached identifying that item. Each ticket includes a unique barcode.

How many items can I track at once?

You can enter and receive details for many tracking numbers at once.
For customers tracking using their account number you can receive details for up to 200 items at once.

I haven’t received my item yet, where is it?

Please enter the tracking number into the track & trace service to find the latest status of your item. Please bear in mind that the time it takes to deliver your item will depend on a combination of the service standard selected by the sender and your delivery location.

What is Courier Track & Trace?

Track & Trace means you may track the progress of your parcel with our online parcel tracker using its unique barcode.
We will endeavour to track your parcel at the following points:
  1. If your parcel is picked up by a CourierPost courier, lodged at a CourierPost depot, or lodged at a PostShop we will scan it when we receive it. Post Centres and Rural Delivery drivers may not be able to provide an acceptance scan.
  2. In the unlikely event that your parcel is misdirected, we will scan it at that destination, and will forward it to the correct destination.
  3. When we are about to deliver your parcel we will scan it at our depot.
  4. Upon the safe delivery of your parcel it will receive a final scan.

    Where is most easy websites for Track & Trace many courier services?

    http://www.trackitonline.ru/

    http://www.17track.net/index_en.shtml

    https://www.aftership.com/track

Thursday, June 20, 2013

Sim functions Sri lanka
 
Dialog
* සිම් එක කාගෙද - #132#
* තමන්ගෙ නමට තියන වෙනත් සිම් - #132#1#1#
*ගිණුමේ ශේෂය ඉහල දැමීමට - *123*පින් අංකය#
*ගිණුමේ ශේෂය - *#456#
*අමතර අවශ්‍යතා - #107#
*සම්බන්දතාවය ගැන විස්තර #678#
*ණයක් ගන්න - #356#
*කරදරකාර එස් එම් එස් බ්ලොක් කරන්න - BLOCK<space>Block කරන්න ඕනි අංකය තමාගෙම අංකෙට මැසේජ් එක යවන්න

*එස් එම් එස් ඩයිවරට් කරන්න - DVI<space>Divert කරන්න කරන්න ඕනි අංකය තමාගෙම අංකෙට මැසේජ් කරන්න
*Star Points බලාගන්න - #141#
*Call Waiting Activate කරන්න - *#43#
*Missed call Alert Active කරගන්න - **62*0777012012#

*Dialog Mobile BROADBAND ( එස් එම් එස් වලින ඇක්ටිව් කරගන්න )

KBB<SPACE>පැකේජය (20,50,100,200,400) තොරා 678 ට සෙන්ඩ් කරන්න

පෙරගෙවුම් වයිෆයි

පැය 2 - WIFI<space>50

පැය 4 -WIFI<space>100

පැය 12 - WIFI<space>200

පැය 20 WIFI<space>400

පැය 50 - WIFI<space>1000 ලෙස ටයිප් කර 678 ට සෙන්ඩ් කරන්න

ඩයලොග් භාවිතාකල දත්ත ප්‍රමාණය දැනගැනීමට MBB ලෙස ටයිප් කර 678 ට සෙන්ඩ් කරන්න

Mobitel

* සිම් එක ගැන විස්තර - #132#
* ශේෂය ඉහල දැමීමට - *102*පින නම්බරය#
* ගිණුමේ ශේෂය බලාගැනීමට - *100#
* ණයක් ගැනීමට - #247#
* ණයක් දෙන්න - *448*අවශ්‍ය අංකය*ණයමුදල#
* GPRS / MMS සෙටින් ලබාගැනීමට -#222#
* M tune ඉවත් කරගැනීමට Unsub ලෙස 777ට එවන්න

* Mobitel Mobile Broadband SMS මගින් ඇක්ටිව් කරගන්න.

දිනක 100 Internet පහසුකම ලබාගැනීමට නම් D25 ලෙස 7678ට SMS කරන්න.( D25, D75, D299 ලෙස යැවීමෙන් 200MB හා 1GB ලෙස ඇක්ටිව් කරගත හැක )

Hutch

* සිම් එක ගැන විස්තර #132#
* ගිණුමේ ශේෂය *344#
* Missed Call Alert ඇක්ටිව් කරගන්න - *62*1000#
* Credit නැතිවෙලාවට කොල් එකක් ගන්න කියන්න - යාලුවගෙ අංකය ටයිප් කර 456ට යවන්න
* Sms Free Hutch to Hutch පැකේජය *222#

Etisalat

* සිම් එකේ විස්තර දැනගැනීමට #132#
*ගිණුමේ ශේෂය ඉහල දැමීමට *336*පින් නම්බර් ඩයල් කරන්න නැතහොත් #133*pin no# අමතන්න
*ගිණුමේ ශේෂය දැන ගැනීමට #134#
*Missed Call Alert Active කර ගැනීමට *346 Dial කරන්න
*Call A tune සදහා *359 අමතන්න
*සම්බන්දතාවය ගැන දැන ගැනීමට *262 Dial කරන්න
*mobile broadband
දිනක 50Mb ක අන්තර්ජාල පහසුකම සදහා D29
දින 7 ක 150Mb ක අන්තර්ජාල පහසුකම සදහා W49
මාසෙක 1GB ක අන්තර්ජාල පහසුකම සදහා M299 ලෙස ටයිප් කර 2211ට Sms කරන්න
* Etisalat Service - #111#

Air Tel

* සිම් එක ගැන විස්තර දැනගැනීමට #132# හො *140*6570#

* ගිණුමේ ශේෂය දැන ගැනීමට *555#
* ගිණුමේ ශේෂය ඉහල දැමීමට *567#පින් නම්බර්#
* GPRS/MMS settings ලබා ගැනීමට ALL ලෙස ටයිප් කර 2222ය සෙන්ඩ් කරන්න

පසුගෙවුම් සබදතා සදහා

* Outstanding balance - *555*1#
* Unbilled balance - *555*2#
* Bill Summery - *555*3#
* Payment Status - *555*4#

Saturday, March 23, 2013

Internet Ththering /Revers ththering

The internet (tethering) connection is enabled in your phone. Connect USB cable, go  to Settings->Wireless & Network Settings->Tethering & Portable hotspot and enable USB tethering.


Alternatively you can enable Portable WiFi hotspot (configure in settings) and connect your computer over Wifi network.
HTC Desire with official 2.2 Android


Steps:
1. Rooted the phone with unrevoked3.
Because I can not paste link, Please search relevant threads.
Please notice, select "charge only" when link phone to PC.
Do not unplug phone till unrevoked3 display "done".


2. Set NAT on laptop
Please search relevant threads.
a) Modify Registry Entry:
HKEY_LOCAL_MACHINE\SYSTEM\CurrentControlSet\Servic es\Tcpip\Parameters
IPEnableRouter=1


In Command Prompt window, run below command:
b) net stop remoteaccess # Stop the RAS Service
c) netsh routing ip nat install
d) netsh routing ip nat add interface "Local Area Connection" full # This interface have internet link
e) netsh routing ip nat add interface "Wireless Network Connection" private # traffic on this interface will be routed.
f) netsh routing ip nat add interface Internal private
g) net start remoteaccess
h) command "netsh routing ip nat show interface" will output
NAT Internal Configuration
---------------------------
Mode : Private Interface


NAT Local Area Connection Configuration
---------------------------
Mode : Address and Port Translation


NAT Wireless Network Connection Configuration
---------------------------
Mode : Private Interface


3. Enable phone's Hot-Spot with default configuration(DHCP enabled).
Configure laptop connect to phone as AP.
So my laptop's WiFi interface will be DHCPed an ip 192.168.1.157
my phone ip is 192.168.1.1


4. Add route and DNS on phone.
a) "adb shell" in command prompt, then "su".
Now you should login as root.
b) run "ip route add default via 192.168.1.157",
So all phone's traffic will be routed to laptop's WiFi interface.
My LAN interface ip is 192.168.15.100.
Just try "ping 192.168.15.100", It should return successful response.
c) Set DNS server, run "setprop net.dns1 192.168.15.1", Get DNS from laptop with command "ipconfig /all".
Not try ping a existed web site. It should return correct response.


Note:
Windows XP can keep NAT configuration after restart. But you should re-run Step 4 after restart phone's hot-spot.
E-Market and Build-in Browser do work. But GMAIL does not work. It seems Gmail check network connection type
NS703is the best tabet with full option facilities. Also you can connect 3G network with internet and Voip facilitics like SKYPE and facebook. 
You can use to this tablet anyware with Analog tv and FM radio .This Tablet has bluetooth connection with connect to Phone and printers.

You can nevigate with gps function with maps and dirctions places where do you going. HD Video functions and 3D game are available for entertains.  

4000maH battery is good for games and tv with multimedia. 7" tft screen is the good looking for videos and pictures.


Quick Details

  • Type: Tablet PC
  • Products Status: Stock
  • Screen Size: 7"
  • Processor Manufacture: MTK6577,1.2Ghz-Dual Core, Cortex A9
  • Processor Type: MTK6577,1.2Ghz-Dual Core, Cortex A9
  • Processor Main Frequency: Processor speed 1.2GHZG
  • Hard Drive Capacity: 4GB
  • Memory Capacity: 512MB
  • Touch Screen Type: Capacitive Screen
  • Display resolution: 1024x600
  • Battery Life: 3Hr-4Hr
  • Feature: Bluetooth,Wifi,GPS,3G,Multi Touch ,HDMI,G Sensor ,Camera, Phone Call
  • Operating System: Android 4.0
  • Weight: 315g
  • Place of Origin: Guangdong, China (Mainland)
  • Brand Name: new sky
  • Model Number: NS703
  • CPU: MTK6577,1.2Ghz-Dual Core, Cortex A9
  • OS: Android 4.0 OS
  • Camera: Front 0.3 MP camera, Rear 2.0 MP camera
  • Wi-Fi: Wireless LAN 802.11 b/g/n
  • 3G: 3G WCDMA embedded, Making phone call
  • Battery: Battery type Lithium-ion 4000mAh
  • Dimensions: 188.38*115.90*12.47mm
  • Color: Black/White
  • Bluetooth /GPS: Support
  • ATV/FM: Support


Specifications


   Processor
MTK6577,1.2Ghz-Dual Core, Cortex A9
Operate system
Android 4.0
Size&*weight
195.5*117.2*9.8mm/ 315 g
Screen
7" TFT LCD 5 points capacitive screen / HD Resolution:1024*600
Battery Charger
Rechargeable Battery: 4000MAH / 5V 0.8A
RAM
512MB DDR3 (Optional : 1GB ram )
Hard Disk
4GB NAND FLASH( Optional: 8GB flash, 16GB flash )
Interface
Mini USB x 1/HDMI x 1 /Stereo Audio out x 1 /Microphone x 1
TF Card slot
TF x 1(maximum: 32GB)
SIM card slot
SIM x 1

3G & 2G
Built-in 3G ( WCDMA850/900/2100 ), 2G ( phone function: GSM850/900/1800/1900 )
Wifi /GPRS/EDGE/HSPDA
Support GPRS / EDGE class12/HSPDA/ WIFI 802.11 a/b/g/n
GPS
Support GPS

ATV
Support ATV

FM
Support FM

Bluetooth
Bluetooth 4.0

Camera
Front camera: 0.3MP, Rear camera: 2.0MP
Video output
Support 1080P video

Game
3D game ,G-Sensor game, Classic game, Touch game
G-sensor
Automatic Four-Direction Rotate screen.
E book format
TXT, EPUB, PDF,WORD,EXCEL, POWERPOINTS
Video format
MPEG-4,H263, H264
Audio format
Mp3,AAC,AAC+,EAAC+,ADPCM

Image format
JPG, JPEG, GIF, BMP, PNG

Software
Support Word, Excel, PPT, TXT,EPUB, PDF ,MSN, Skype
Color Available
Red, black, golden, gray, blue etc

Accessories
Gift box , Instruction Manual , Charger ,USB cable,
Languages
Chinese ,English ,Italian and Spanish.etc
Gift box
240 ×160×70mm